the dorbel daily

Sunday, 27 March 2011

Don't Hit Me!


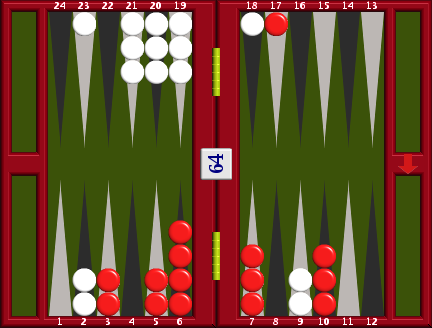
A common feature of mistakes at all levels of the game comes when we fail to evaluate positions from the viewpoint of the opponent. At the lower levels, novice, beginner and intermediate, this often shows itself when the student doesn't double positions that he would pass from the other side! Another common manifestation of this is reluctance to hit loose when the thing that all of us dread is being put on the bar! Here's a fine example shown to me by Rick Janowski. What would you do with a 6-1 here?


It's 0-0 to 7 points and Red trails in the race 119 to 99 before the roll. The home boards are on the right today.
XG 3-ply likes to run, as did one famous Giant Top 10 player. You might also consider the quiet 9/3, 9/8 and there are various ways to hit loose of which 9/2* seems to be the best. The current world champion voted for hitting but admitted that over the board he would probably have played 22/15. Hard problem? Now think of it from White's point of view. Would you like to be hit or would you like to be left alone to play all your roll in peace? It seems to me that you don't want to be hit for sure, which would lead to 9/2* and that is massively correct.
The running play is a huge blunder, losing about 0.25ppg against hitting and even the quiet play is a blunder costing about 0.12. Phew! If your usual tactic in prime/prime battles is to leave your opponent to break his prime then hitting seems to be anti-thematic, but it's right more often than most people imagine.
Some points to note here. Rick pointed out to me that leaving the anchor gives White the game plan that best suits her position. She can't improve her prime but she can blitz and her made 1 and 2pts will suddenly become assets.
White is at the edge of Red's prime, escaping with most fives on her next turn or later on. Hitting her away from the edge of the prime is axiomatic.
Red trails in the race which points to hitting and hitting also clearly wins more gammons. The cube is also a factor. If White can get out her race lead is usually enough for a strong double, whereas after the hit, only 5-2 from the bar (and a Red lemon) is good enough to turn the cube.

At the end of a match with a student, I had another position where I could hit or play quietly. Here it is.


It's Double Match Point and I lead 104-130 in the race. I thought about the nice quiet play 9/3, but in the end decided on 9/5, 4/2*, even though gammons are worthless. After White hit back and I danced twice and White escaped and the match went quietly down the tubes of course I regretted the hit, but it is correct. Putting White on the roof prepares to make the 2pt, stops her making another point inboard on her next roll (except for 2-2 and 1-1, both great numbers anyway) and most importantly creates the time and space to break the anchor and run them round. If you leave White alone this turn you will only face the same problem later, by which time she may have made another point or two inboard and be much more of a threat. Hard to see? Put yourself in White's shoes, do you want to be hit? The answer has to be no, so always do what the enemy least wants and whack it!
Until the next time, enjoy the game!


Saturday, 19 March 2011

What Did You Do In The War Daddy?


Let's have some fun today and look at three checker plays that I got wrong over the board. I'll put the three positions up and we'll treat them like a quiz, so take a minute or two for each if you need it and write your answers down. I find that it is a big help to set the position out on a real board. In each position Red is on roll and the home boards are on the left.

Position 1.


5 Point Match, Red 1, White 0, Pipcount Red 137, White 137, Red to play 6-1


Position 2.


5 Point Match, Red 1 White 0. Pipcount Red 111, White 127. White owns the cube.

Red to play 5-1.

Position 3.


5 Point Match, first game. Pipcount Red 154, White 149
Red to play 6-4.

OK, Let's take a look at them. Position 1 first.

Over the board I played 11/5, 6/5. I vacillate between avoiding risks that should be taken and taking risks that should be avoided and for some reason I went for the "safety first" play here. That's too small and a blunder and the best play is actually 8/2, 6/5. This makes a third point and diversifies Red's spares, preparing to attack next turn if possible. The blot left behind on the 11pt isn't much use there, but if it gets hit there's going to be a lot of return shots and Red will have the stronger board.
TIP: If you have to bury a checker on the 1pt or 2pt, it's usually best to make it as soon as you can. It turns an embarassing and useless blot into a small asset. I should have done that and looked around for the 1. 11/10 isn't very bad, but it's an error compared to 6/5. I hope you didn't vote for 20/13. Leaving the golden anchor in an even race just can't be right.

Now on to position 2.


Red has a big solid lead here, 22 pips after the roll, so I decided to play 8/2 and hope to point on the White blot later. I find these problems so hard, it's a choice of "Pay now or pay later" isn't it. Like position 1 I vacillate between the two, perhaps it's a confidence thing. When my results are going well I play very freely, but tend to tighten up when things haven't gone so smoothly. The best play is actually 6/1*, 2/1. The idea of this is to bring the White checker "under the gun" so that with the security of my golden anchor I can hit it freely and go for a close out. This is the best plan because that horrid stack on the 5pt is useless for point making but will work quite well for hitting and covering the 2pt later. Of course this plan gives White an immediate shot from the bar that will equalise the race, but Red has a high anchor and will get return shots of his own, lots of them. The hit play wins 58% to the quiet plays 57%, but the big bonus is the extra gammons, 20 rather than 15 and a doubled gammon will take Red neatly up to 5.
Is there a useful guideline that might indicate to us when to move to a blitz? Yes there is.
TIP. The best way to take advantage of a better home board is to get into a blot hitting contest.
Put White on the roof here and he has 9 dancing numbers, compared to Red's 4. That's enough to go for the blitz option, particularly with that 20pt anchor as insurance and particularly here where Red can't really hope to build a prime.

Position 3 might be the hardest of these.


I decided to make the five prime, 13/7, 11/7. A five prime is a big asset of course, but Red pays too high a price for it here. It leaves a shot, it abandons the valuable midpoint and it leaves three checkers, 20% of Red's army still trapped. What else can we do? 11/1 is safe, but creates nothing and reduces Red to 14 playable checkers. 22/16, 5/1 is a bit better, but still buries a checker. Best of all is 22/16, 11/7! This escapes one man fom the anchor and slots the bar neatly duplicating fours. How important is it to escape a man?
TIP. The most useless spare is the one on your anchor.
You can't afford to have three checkers on your anchor; that spare has to get into the game, the sooner the better and this is quite typical. Strong players routinely jump this man into the outfield in much more dangerous situations than this.
Basically this is a prime versus prime contest and having as many checkers to play with as possible is paramount. That checker has to come out, not to race but to take part in the battle. Think of it as a battlefield reserve battalion; throw it into the battle now and it might tip the balance. Troops in reserve don't win any fights.
Well I learned a few things looking closely at these mistakes, I hope you did too. Until the next time, enjoy the game!


Wednesday, 9 March 2011

More California Dreaming


If you looked at the previous post, you will remember that we are looking at a player who won seven games to six but lost the match 9-7. We'll pick up the match at 2-2, with Red on roll in this position.

He trails in the race a little, 120-113, but he has some poweful attacking chances here. Would you double this? Unquestionably you should. Are you 100% certain that this is a take for White? No? Then turn the cube! Easy isn't it? The key to this position is not so much the number of wins and gammons that Red can expect from here (65% wins including 20 gammons according to Snowie), but the volatility. The time to double blitz positions is before they work, not afterwards and here Red is about to launch a powerful and gammonish attack with sixes, fours and threes. 5-4 escapes and Red's only very bad numbers are the non-hitting 5-5 (which is at least 20 pips for the race!) and 5-2. Sadly Red failed to double this juicy blitz and worse, failed to hit loose when he rolled 3-2. White breathed a sigh of relief and rolled 6-6, making two points and putting Red on the bar. Red fanned to leave this position with White on roll.


As White , would you double this? As Red, would you take? White leads 89-116, but he does have four blots, he has two high points open in his board and he still has one man trapped behind a broken five prime. White (me) went with the volatility, doubled and Red passed. Now this is interesting, because if Red owned this position, I swear that he wouldn't double, yet he passes! I was in good company cubing, as Snowie 3-ply will double this, but rollouts (Snowie and Gnu) show that this isn't yet a double and of course passing is awful. Don't think so? Play it 50 times owning the cube and you will be astonished how many different ways Red has to win, both when he enters quickly and later when White fails to escape. Don't forget that on average it takes White just over three rolls to roll a five and if he can't escape in four rolls his board has usually collapsed. These positions have an interesting feature that is often overlooked. Red will keep his block in position when he dances, but White has to keep moving when he can't escape. Cube ownership is huge too. Anytime Red can enter and White can't hit or escape, Red can redouble to 4. It's probably a take but it's no great bargain.
It can't be emphasised too often or too strongly; backgammon is a game of aggression and the most aggressive player is the winner more often than not. Ask any world class player which opponent he prefers, a cautious player who is timid with the cube or an aggressive player who turns the cube at the sniff of a gammon. You are only going to beat a better player if you get the luck, so make sure that when it comes your way you are winning more than one point.
Until the next time, enjoy the game!


Sunday, 6 March 2011

California Dreaming


Usually in this blog I try to focus on my own mistakes. It's good for my own learning process and avoids exposing people to unwanted criticism. Occasionally though, I get permission to feature somebody else's errors and here are some from a regular opponent on Fibs. He's ranked at 1755 which will give you some idea of where he stands in the hierarchy.
His problems, like those of so many, revolve around cube use. His checker play is quite good, but he has the worst possible combination of cube errors. He doesn't double early enough, he cashes games that are too good to double and tragically, takes some passes. Our latest match lasted for 13 games, of which he won 7 but lost the match 9-7.
Here's where the points went missing.


Red is on roll, he trails 0-2 to 9 and he leads 108-118 in the race. Should he double? Unquestionably yes. There are two ways of arriving at this. The first will stand repeating yet again, it is Woolsey's Rule. It goes, "Look at the position from your opponent's point of view. if there is any doubt about the take, it must be a double". "Any doubt" is the key phrase here, it means that if you are not 100% certain that it is a take, it must be a double. Actually it is a take, but certainly if doubled here I wouldn't be 100% certain and I certainly didn't want to be cubed.

The second way to look at it is this, an acronym called PRAT. This stands for Position, Race and Threats. Traditionally an advantage in two of these areas is thought to be enough for double and take and an advantage in all three is double and pass. Actually this is a bit too crude and you need to refine this a little and ask yourself how big these advantages really are, but it will do for this position. Red's Position is a bit better as White still has a man behind a four prime, but this is mostly counter-balanced by the fact that White is at least at the edge of the prime and his own strong board will make hitting loose by Red a risky option. The Race favours Red but it isn't overwhelming; a ten pip lead in a 108 pip pure race would be a take. The Threats favour Red, threats being sequences that lose the market, e.g if Red hits and White dances, then White will no longer have a take. We can see here that all the doublets are excellent, as well as 4-3, 4-2 and 3-2, that's 12 numbers straight off. In addition all the above average rolls play safely and there are only a couple of lemons, 2-1 and 3-1. So all in all, strong double for Red, uncomfortable take for White.

This next one isn't quite so obvious, what's the correct cube action here?


Red trails 1-2 to 9, but leads in the race 108 to 132. Woolsey's Rule, are you sure that this is a take for White? If you said, "Yes I'm sure", then you are a bit wide of the mark as this is actually a pass! Positions where you are anchored on the 24 or 23pt and your opponent has escaped all his men and leads in the race are usually passes. Don't be misled by the fact that White holds the 16pt as well. It isn't going to bother Red much on the way home and those checkers aren't much use to White until they move round to complete his board. If you are doubtful about doubling this as Red (or passing as White), set up the position and play it out 50 times. You should find that White will win 23-24% of these, but 11-12 of his losses will be gammons and that's enough to make it a close pass.
Another way of looking at doubling decisions is to adopt the advice contained in Clausewitz's Rules of War; "Always do what your enemy least wants". As Red the last thing that he wants is to be doubled here isn't it? If you evaluate this rather conservatively and think that this might be a double and might not, then Clausewitz has advice for that too. "Faced with two courses of action that are approximately equal in strength, choose that which allows your enemy the opportunity to make a mistake". If you leave the cube in the middle, no chance of a mistake. If you double on the other hand, he may take when he should pass (as here) or pass when he should take. I might well have taken this.
Moreover, once you have doubled you can't then make another doubling error, whereas the enemy may make several. There are many players who hate to double you in with a 4 cube, actually the player playing Red here is one of them. You can double these players in very early indeed, because they don't get the vig associated with owning the cube! All of these guidelines point to being aggressive with the cube.
In my next post we'll look at some more positions from this highly instructive match and discuss the important concept of volatility, but in the meantime, enjoy the game!


Tuesday, 22 February 2011

More Blundering.


It's a good time to remind ourselves of Uncle Jake's minimal guide to good cube action for the trailing player in short matches. Memorise this. It will save you a lot of thinking time.
"Develop some sort of gammon threat and ship it in".
That's it, short and sweet and as near to infallible as you can get in bg. Here's a position that demonstrates it nicely and where I fell asleep and left the cube in the middle.


Red trails 1-2 in a match to five and trails in the race 137 -130.
This is a very clear double and a fairly easy take. What Uncle Jake means by "some sort" of gammon threat is anything that is better than you start with. About 26% of games played to a finish end in a gammon, so you start the game with a 13% chance of a gammon. Red wins about 63% of the games from here, of which 19 will be gammons, so that will do nicely. Of course it is very hard to tag those sort of numbers onto a position, although some people can do it, but like most people I just rely on my sense of smell and this has a definite whiff of gammon about it! Not only that, it is very volatile and this is a vital ingredient. 10 numbers (4-4, 3-3, 2-2, 1-1, 3-2, 3-1, 2-1) put White on the bar and complete the five prime. Red will also hit loose with all his other ones, twos and threes so it is beyond me to say why I didn't double in the match!
For money a double is an error and if Red was leading in the match it would be a big blunder, but for the trailer it's clearly right. The cube has little value for White and her own gammons are partially wasted by overage.

Well, I hit loose and White hit back from the bar, but the dice god gave me a 3-3, almost the best roll possible. How would you play this?


The first three are pretty easy, bar/22, 8/5*(2) and I chose 11/8 for the last one, getting another builder into the zone and slotting the back of the prime. This is a blunder. The checker on the 8pt is vulnerable to 6-2 and 5-3 from the bar and I just don't need that risk, partly because if not hit I have a great cube next turn and partly because my game plan has to be blitzing against the lone man back rather than priming. The clear best play with the last 3 is 7/4, still with three attacking checkers, as Red will break the bar to hit, plus double coverage of the outfield for White's 6-2 and 5-3 from the bar. She should step out with either of these, so note that these rolls have been converted from excellent to very bad if you play 7/4 instead of 11/8. This swing accounts for almost all of the difference between the two plays.
That was a tough play to find I think, so apart from noting that doublets often require a little more thinking time than singletons, let's move on to my third blunder of this game.

By this time I've managed to double White in and have a 3-2 to play in this very strong position. Any ideas?


The first thing to say is that 6/1* is very horrid. Red will hit White loose if she gets up to the 23 pt but no point in hitting on the ace until you have some cover numbers and can go for a close out. I sort of fiddled around at the back without any clear idea in mind and played 24/21, 22/20.
You wouldn't think that you could make a big mistake here, but this play is a blunder.
Two things to think about here. White has what is called a brittle structure, with stacks on the mid and 6pts and three checkers buried on her deuce point. She isn't going to develop this into a prime but if she can point on a Red blot or two she has a chance to get back into the game. Red has to counter that by anchoring 24/22. You will see this time and again. Counter brittle structure with a rock against which it will break. So, that leaves a 3 to play and the best 3 is 13/10, not 6/3. Why leave a shot? To gain a double shot if White throws her magic 6-1, to increase the chances of making the 8pt and to give more hitting numbers if White moves up to the 23pt. As this play also duplicates the 1 that White needs to get to the edge of the prime you it's a bit of a no-brainer, but only if you have engaged your brain in the first place. Before making my nothing play I should have asked myself the pro question, "How do I plan to win from here?" It's a good idea to mutter this under your breath from time to time.
Well, that's about it for today. Thanks for reading, let me know your thoughts on these, or indeed any positions and until the next time, enjoy the game!

Tuesday, 15 February 2011

Put 'Em Where You Want 'Em.


Backgammon is often at its best in tough midgame positional struggles. Here are three interesting positions that a strong player got wrong. See if you can do better.

Red leads 3-0 to 5, but trails 147 - 129 in this game.

Although Red trails in the race his stronger position is enough to make him a small favourite. He has the golden anchor and all his checkers are in play, whereas White has already buried four checkers and so has to play the rest of the game with 11 checkers. In the match, Red chose 10-4 but 20/15, 7/6 is much better even though it leaves a shot.

The theme to keep in mind for this sort of game where you have the golden anchor and you are fighting to prime White’s straggler is this. Ignore shots and put your checkers where you want them. Your anchor (and White’s crappy board) mean that you can leave shots without a serious risk of a bad sequence that gets you cubed. Of course you don’t want to take risks without some gain, but the gains after 20/15, 7/6 are substantial. You free up the spare from the anchor (almost always a useless place for a spare) and you keep two spares aimed at the 5pt.

The next position shows Red making the same sort of mistake, although I grant you that this is a tough play to find.

Red played 7/3, 7/6 giving up his very valuable bar point, but “putting your checkers where you want them” also means leaving your checkers where you want them sometimes and here, with White’s blot inboard, it’s worth keeping the bar and leaving the double shot after 15/11, 15/14. Note that this is better than 15/10, one less shot and duplicates fives and two’s to hit and cover.

And here, in a different shape is the same mistake again.

No need to labour the point. You can see for yourself that 15/14, 3/1, 2/1 is easily the best play as White now has two blots inboard.

The 20pt anchor is a great insurance policy and when your opponent has a weak board as well you can pretty much ignore shots and put your checkers where they will do most good. In these tough positional struggles it's a great guide to finding the right play.

Until the next time, enjoy the game!


Tuesday, 1 February 2011

The Cube's The Thing.


It's so important to get your cube action right. Most games are won by luck anyway, regardless of the checker play skills, so getting the cube to the right level (high in winning games, low in losing ones) is fundamental to success in match and money play.
Expert players carry a library of reference positions in their heads, positions where they know the equity and can compare it to what they face over the board. Here are two quite differing positions, the first commonplace, the second less so, but still essential for success.

Here's the first and it's 0-0 in a match to 7. White is on roll, leading 114-139. What's the correct cube action for both sides?


White leads in the race by 25 pips, she has escaped both her back checkers and if she clears her midpoint next turn she will lose her market, so the double is absolutely clear. Should Red take? If it was just a race Red would have a clear pass, but with his anchor he stands a good chance of getting a shot during the bear-in. Is this enough to give him a take?
I tend to take a few too many of these and I should have passed this one. White has 11 rolls that clear the midpoint immediately and also has a spare 6 and two spare 5s with which she can fiddle around while waiting for a clearing number. My side of the board is important as well. I already have the 5pt (essential!) and I may be able to build a nice board ready for a shot, but may be isn't will. I have to know that a shot will win for me.

Good reference positions are those where the take/pass decision is very close, so that when you come to compare it with what you have on the board, you can say, "Any improvement and I can take, any weakening and I should pass". The above position isn't a good reference, as it is a very clear pass and the take loses 1.2 points on average. The position below is much more useful. The race deficit is still 25 pips in a shorter race (White 100-Red 125) and the take/pass decision is very close indeed.


Although White's race is a bit better, because the race is shorter, her position has weakened in several respects. Now she only has 7 numbers that clear the 13pt immediately and with only one spare 6 and one spare 5 she has less time to wait for a clearing number. Red has improved too, with a solid board already in place and the bar pt slotted. I think this one too is probably a pass, but it's very close, certainly close enough to be a reference.

This next position comes from the same match and I am on the bar trailing 2-3 to 7.


You have to look at these with a view to doubling, even when on the bar against a four (and potentially five) point board. Although White only has 13 shots all the ones play well too. Even dancing isn't fatal yet. White doesn't always cover straight away and has to dig her back men out pretty quickly even when she can make a 5pt board. Giving the cube away in these two way gammonish positions doesn't hurt too much as White can't redouble without putting the the match on the line. This is very much a trailer's double. You shouldn't try this one when level or leading, but any sort of deficit makes for a strong double here. In the match I didn't double ( a large error) and eventually lost an undoubled gammon!
As a reference position it's fairly useful as a minimum double position. Red could actually be a bit weaker than this and still have a correct cube, while at some scores White should even pass. If Red owned the cube it would be a huge redouble of course and a pass.

Well, I hope you find these useful. I'm sure that you'll see something like these every week and in the case of the 20pt anchor positions, every day! Until the next time, enjoy the game.