the dorbel daily

Showing posts with label backgammon positions for students. Show all posts

Thursday, 22 March 2012

Blundalonga dorbel, part 26 of a never-ending series.

One of the beauties of this game is the bewildering variety of different scenarios that you have to master. There isn't just technique, there are techniques in endless permutations, some you may only see once a year, some once a week, some daily. There is no doubt that working on daily situations will pay the biggest dividends, but now and again it's nice to look at something a bit different. Here's a series of doubling decisions from a recent match.


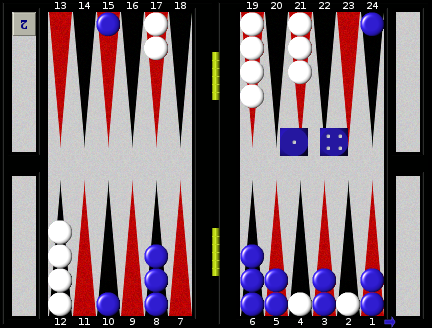
White is on roll, it's 0-0 to 5 and Black is on the bar. Cube action?
It's my guess that you will take longer over this here than you would in a match. Perhaps it should be the other way round! Anyway, White has semi-escaped and leads by 31 pips (105-136) and Black is on the bar against a four point board. White doubled, correctly and passed the headache to Black. I can tell you what went through Black's head, because it's me. I thought, "I've seen this before and it might be a close take, but I'm really not sure, so based on the fact that I've taken a lot of passes lately, I'll give this one a miss".
Tragically this cost me about 0.3 of a point, a triple blunder! Here's a list of the mistakes I made.
I didn't take long enough to think about it.
My decision was influenced by recent events, rather than viewed in isolation.
I didn't consider carefully every checker on the board.
This last was the worst. Here's what should have steered me towards a take.
White has seven checkers out of play, so from here she can only use eight checkers. All my checkers are in play.
White hasn't completed her escape. Move those two checkers on the 16pt to the 13pt and this is a very powerful double, worth 0.903ppg after double and take, compared to about 0.685 in the position above. This true even though it leaves White with a stack on the midpoint and a single blot in the outfield, a famously weak formation. This position is much more like what I thought I remembered.
White also has to cross an untenanted outfield, again a big positional defect. Move a checker from the 13pt to the 8pt in the above position and White's equity jumps to around 0.987 after D/T, making this a very valuable reference position, so here it is.


Now White has a landing point, no immediate blot and an extra checker for attacking. This is as near to a marginal take/pass as you can get, so worth remembering. Any improvement for White, it's a pass, any improvement for Black, it's a take. We haven't really said anything about Black's checkers, but that powerful four prime is very important. It would be even better if it wasn't "front-loaded", with the spares balanced on the inner edge, so any improvement there would help Black for example.
As I say, well worth remembering, even though you won't see one close to this very often, but there is a whole family of other positions where Black is on the bar and White has a four point board with a big hole in it. Doubling these generates a lot of wrong passes and if you would have passed position one, perhaps remembering this one will give you more confidence in the future.
We'll look at some more from this match tomorrow.

On Saturday 24th at 0900UTC, I am playing BushSucks in the final of Fibsleague season 55. It will be a 13pointer and I hope well worth watching. Whisper command only for watchers please.

Also this weekend, on the 25th, David Escoffery will make the draw for the Fibs Spring Open. There's already about 100 players in, generating a $5,000 prize pool, so why not give it a go? Rules on http://www.escoffery.com/spring.html , get your entry in quick. You can pay after the draw, but paying with entry is worthwhile as only paid entries can receive a first round bye.
Hope to see you there, until then, enjoy the game!

Tuesday, 6 March 2012

Learning To Love The Cube, part 4

In the last three posts, I've been making the point that very early doubling, particularly in positions where there is a strong gammon threat, is a tactic likely to lead to more wins for all of us. It's the way that the bots play and it's the way that the best humans play too. Even when the cube is too early to be technically correct, it can still reap benefits in two ways. It can generate a wrong pass, not common but it does happen and it also means that you can't then miss a string of correct doubles and wind up cashing when you are too good, a very common occurrence. A student makes the point that when this happens the bot doing the analysis assigns an equity loss to each of these events and adds them together. "This can't be right" he says. I put this point to the leading technical expert Rick Janowski and I quote his reply word for word, as I can't better it.

RJ: Your student has a point. XG adds all the errors together which over-emphasises the scale of the error.Taken to its extreme a run of several very similar cube errors could result in a total equity error much greater than the overall value of a game, which cannot be right. Nevertheless, missed cubes can still result in substantial cumulative overall equity loss, whereas early doubles do not carry the same ongoing risk.

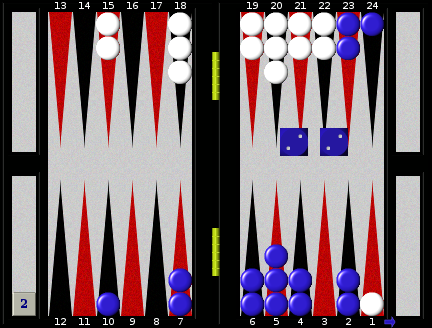
In the comments, Robert Fontaine takes me up on a side issue, where I said that an ace point anchor on its own is always a pass. "Is this true?" he asks. Like almost any statement in bg, I could hedge this one round with lots of ifs and buts, but it's mostly true once the attacker has escaped to the midpoint. Here's a case in point, from the very next game after RF wrote his comment funnily enough.


Black is on roll in the first game of a three point match, at which score this is a huge pass. It's still a pass for money too. White just doesn't win enough games. A very important factor to consider in any position where hitting a shot is vital is, "Is my home board ready to contain a hit checker?" Here it isn't and White must give it up.
When you put this position and others like it through the bot that you use for analysis, you will find that not doubling in this position is only a very small mistake in terms of equity loss. This is because you can almost always cash next turn anyway and will rarely become too good to double. However failing to recognise that this is a cube is a big conceptual mistake! People commonly play on here thinking, "I'll just wait and see if this gets more gammonish, as he's certain to pass if I double now and I'll only get one point". True, but (a) he may get a joker sequence after which you won't even have a cube and (b) if you double now, you may get a wrong take anyway and (c) you don't want to have to keep making "Should I double?" judgments for the next 15 or 20 rolls. It's something of a truism that people playing on for an undoubled gammon against an ace point anchor are either making a mistake or have already made one! In certain positions though and at certain scores, this does become a more attractive option.


I'm playing Black here, leading 1-0 to 5. White, a decent checker player but notoriously timid cube handler, has missed five opportunities to double me in or out in a prime/prime battle, after which I rolled 6-6 to end up here. With White having three men on her anchor, this is too good to double even though there are a few joker sequences that can lose for Black. The tragic sub-plot is that I accidently clicked on double and White gratefully passed!

Finally, if our attitude towards doubling should be bold and aggressive, pushing the boundaries of what is technically correct, how should we view our take/pass decisions? Falafel, perhaps the best player in the world, says, "If in doubt, I take". This works well for him, because his superb checker play and the possibility of his usually inferior opponent making errors, means that he can approach or equal and sometimes even exceed the theoretical equity of the position. Should we imitate this? I'm not sure that we should. In all positions other than simple races and holding games we will struggle to approach the theoretical equity and may also fail to use the recube efficiently if things go our way. Having always been in the "inclined to take" camp, I am now trying to pass the close ones, even if this means giving up some equity here and there. This is because I now use XG and its collected stats show me that I lose more from wrong takes than I do from wrong passes, particularly of course, the ones that have a lot of gammons attached. Look at it like this. We can be inclined to be bold when we double, because these decisions occur in games where we are winning. Take/pass decisions occur in games where we are losing and we only get one chance to get it right. The hardest of these are unquestionably blitz positions and I will trawl up a selection of them for you to look at in the next post.

Until then, as ever, enjoy the game!

Wednesday, 22 June 2011

Slot Or Not


Position ID: OM/gARIzOycIIA
Match ID: QYnwAEAAAAAA

I will go on with the last position from the previous blog in a minute, but first I want to show you the preceding roll, as they make a very interesting pair. I got both of these wrong.
In the above position, Blue trail 7-away, 3-away and White owns the cube. I played 8/4*, 15/14 (to duplicate twos and give me 5-5 as a cover number). This is wrong. If White hits back from the bar, my blitz stalls. If she doesnt, I can carry on blasting away. Either play of course leaves the same chance of anchoring on the 4 or 2pts. It would be nice to have the 4pt slotted, but with four blots around the board, this is too much risk to carry. 8/4*/3 is the best play. The 4pt is not yet so important that I need to take a big chance to get it.


Then we came down to the next roll. White has anchored, so should I leave the 4pt slotted? Now the answer is yes! White is going to sit on her anchor until the end unless she gets a shot. Now Blue needs the 4pt a lot, as an essential part of the prime that he needs to build. 14/10 is the play, cutting the blots down to 2 and putting a lot of pressure on White if she breaks her anchor to hit. We could of course cover the 4pt from the 8pt, but giving up the point that blocks White's sixes is a high price to pay and gets us back to 4 blots, which as I never tire of pointing out is more than most positions can cope with.
What we have seen here is two different game plans. In the first position Blue is blitzing and doesn't need the extra risk of the slot which may stop his blitz dead, particularly if White can hit twice. In the second position White has anchored, so Blue must switch to priming and the 4pt is vitaly important to that prime. Leave it slotted.
Clearly I haven't had these principles organised in my mind, but they do come up a lot, so I'll be on the look out for the same thing again. Let's hope I get it right next time!

Now here's one from another match.


Position ID: bLdjACBmtxEALA
Match ID: UQmpAAAACAAA

Blue leads 1-0 to 5, owns the cube and is in a lot of trouble. If you can get this one right for the right reasons I will be very impressed!

Give me some thoughts, don't be shy, you may have thought of something I have missed and then we'll all earn something new. I'll try and post this tomorrow. Until then, enjoy the game!