the dorbel daily

Showing posts with label Learning Backgammon. Show all posts

Friday, 20 April 2012

Tools

A long gap between the last post and this I know. I've been away and then doing some work on my own game and then some thinking about what (and who) this blog is for and then some idle procrastination.
All of us ask ourselves the same question, "How can I play better?" Then we log on and play some matches and then we analyse them and look at our mistakes. Then we play some more matches and so on. At least this way we don't get any worse and over a long period it will help us improve, but noticeably, not by much. After the first year or two, it's rare to make much progress. It looks as if this process doesn't work and I think that is because it isn't sufficiently focussed on the repeating mistakes. So, I am trying a new method on my own game and perhaps this would work for you too.
The method works like this. Go through your match, with Gnu or Snowie or ideally XG2, note the big mistakes and focus on those where you haven't understood what you should be doing and why. Ignore those where where you've had a good idea of what you should be doing, seen all the candidates and made an honest but understandable mistake. With the rest, try to put them into a category by type.A quick list might look like this.
Failed to be guided by the pipcount.
Played a doublet too quickly.
Rejected hitting loose on a low point (always a problem for me!).
Missed a cube by failing to use PRAT.
Failed to stay pure in a crunch situation.
Took a gammonish cube without being certain that it was right.

These are just some of my weak points, your list might look completely different.

Once you have your list and it begins to fill up with repeat offences, you need to figure out why you are making these mistakes. Not concentrating enough? Playing when you are tired (or hungry, or thirsty, or intoxicated, or bored, or depressed)? Not really understanding the position? These are just some suggestions, your own list might look completely different.
To recap, you need to know what sort of mistakes you are making regularly, then identify why you made them and then learn how to avoid them.
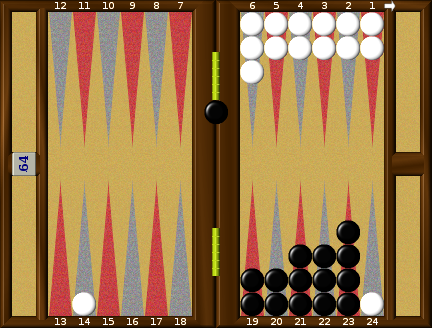
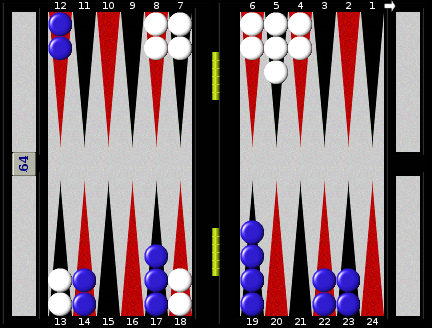
Here's an example. A student of mine faced this roll. What's your choice?


It's 0-0 to 5. Make your play before you read on.

He played 13/8, 6/3. It looks fairly natural, but it's an auto pilot play, of the type that we all make when we are feeling lazy. It's a particularly bad time to blunder because this game is arriving at the Crunch Point, where the game will be decided one way or the other. Either Black will get home safely or he'll leave a shot and be hit.
The best play by a lot is 13/10, 6/1. A highly skilled player with a very advanced positional sense might get this right by thinking, "It can't be right to pile a sixth checker on the 3pt. I may very well want to hit something in the bear in, so I'd better slot the ace and then one of the spares on the 3pt will at least have something useful to do." A more pragmatic player or even the same player might think, "I'll make the safest play for next turn, it's usually a good guide." Then he'll read the numbers. This just means looking at all his next rolls after each of the candidate plays (there are only two) and seeing which of them leaves a shot. Did you do this before choosing your play. If you didn't, go to the back of the class! Do it now and you will quickly see that 13/8, 6/3 has 14 blotting numbers next generating a total of 234 hits, while 13/10, 6/1 has only 9 which generate 126 shots. One of these, 5-5, you'll leave voluntary double shots although you could play safe but with much greater extended jeopardy.
So here is a bearing-in error, made by failing to read the numbers. How often do you read the numbers? If the answer is never, then it's time to learn and the only way to do that is to practise, by looking through your matches for bear-in positions and counting them up. Do it with pencil and paper at first, then graduate to doing it in your head. Do it until it is easy and then do it in matches until it becomes second nature to always do it. It's going to swing a lot of losses into the win column. Note that in most cases (and particularly here) you'll need to multiply the shot numbers with the number of shots that they leave to get the definitive answer.

News. Fibsleague season 56 ends on the 27th of April. Master A is still very open with a lot of matches undecided and a lot of players in with a chance of catching current leader BluNick (Italy) who has 8-3 with a match to play. Master B is however decided, with Backwoods (Finland) and BushSucks (Germany) through to the play-offs yet again, so congratulations to these perennial strong men. At the other end, jackdaddy and blotsalot (both USA) are relegated with magic_one, DeaDice (both USA) and Gammonrider (Germany) battling to avoid joining them in Gold next session. This is a very good time to register for the league and enjoy regular tough matches in a well run league, for which we have to thank Franck del Rio, better known as Tomawaky, who is now in his eleventh year as director. Take a bow Franck!

Tomorrow we'll look at another blunder and how it might have been avoided. Until then, enjoy the game!

Sunday, 1 April 2012

News and Blunders.

As of today, those who base their plays on XG2 rollouts will be looking with interest at new results showing that making the 5pt may not be the best opening 3-1 after all. At GammonGo the wide-open 6/5. 6/3 is almost certainly better, many more gammons and a chance to go into a deep backgame if hit. I look forward to trying it out, so let me know how you get on with it.

The Fibs Spring Open is under way with an entry of 105 players, generating a prize pool of $4, 725.
There are 13 previous winners in the field so it should be a tough tournament to win. This tournament offers a rare Fibs chance to see Kit Woolsey in action, still one of the strongest players in the world.
In the real world, Easter is always the time for the Nordic Open and as usual a very strong field will be on its way to Denmark. It's not too late to book in, http://www.nordicopen.dk/ has all the details.
A lot of the players from the Nordic will then head off to Velden in Austria for backgammon by the lake on the following weekend. This too will be well run and offer a good deal to players of all standards, so go to http://www.wbf.net/ for details. Even if you don't think of yourself as a strong player, you'll find a division suitable for you at either of these venues and you'll make new friends and have a great time for sure.

Robert Fontaine recently made the point that it is very difficult to improve one's standard of play, even with a lot of study and work. I know how he feels! There's no doubt though that concentrating on the blunders, the really big mistakes is the way to go. A blunder costs you more than a tenth of a point, so keeping these off your scorecard will make you an overnight expert. Here are some of mine, without comment, so take a look at these and let's see if you would make the same mistakes. I'm playing a 7 pointer with The_Blade, a very strong Israeli player.

Position


0-0 to 7, White has the cube, Black to play 3-2.

Position Two


Black leads 4-1 and has the cube and has to play 5-4.

Position Three


Same game, Black leads 4-1 to 7, holds the cube, is on the bar and has a 4-2 to play.

Position Four


Now it's Crawford, Black leads 6-1 and has to play a 5-3.

Position Five


Lastly, post-crawford, Black lead 6-3, has the cube and has a 3-1 to play.
How hard are these? I got them all badly wrong, so let's see if you can do better. Until then, enjoy the game!

Monday, 26 March 2012

More Midgame Cubes and Recubes

For the player trailing in a short match, his cube strategy can be summed up in the immortal words of Uncle Jake (Jacobs), "Develop an enhanced gammon threat and ship it in". Not very difficult, certainly a lot easier than entering the murky world of gammon prices and match equities at this stage. It is an infallible guide, in which the worst that you can do is give the cube away a bit early. It is worth expanding slightly on what constitutes an "enhanced gammon threat" though. At the start of any game you have about a 13% chance of a gammon if the game is played to the end, so around 20% gammons can be considered "enhanced". However, we can face some difficult decisions, notably when we have thrown a joker and suddenly jumped from not good enough into the "Am I too good?" area.

Position One


Black trails 0-1 to 5 and has just thrown 6-6 to hit three checkers and make his 2pt. White has fanned. Too good to double? Over the board I felt that this was much too good, after all, isn't it a bit wimpy to cash when your opponent has three men on the roof? A rollout suggests though that Black has the same equity whether he doubles or not, 1.00pt. Note that as advertised here ad nauseam, the cash is a real point, the play-on is theoretical and you have to play to get it. This is actually a reference position, although probably too rare to be of much use.
I rolled and covered the 4pt and White entered a man.

Position Two


This is now clearly too good. Black has improved his board and White's entering checker isn't enough to balance that. Everybody plays on, nobody takes, but note that Black's equity after rolling is still only about 1.1ppg. What happened next?

Postion Three


Black hit loose and White entered with a hit to leave this position. In the previous two positions it's been in my mind that even if White enters with a hit, I'll still be able to double from the bar and here it is, Black cubes. This is a big pass. Positions where you have a four point board and a man on the bar and another blot to shoot at are almost always passes. Here White still has two on the bar! Nevertheless, it's bonanza time for Black and White took, a double blunder and Black's equity jumps to around 1.2ppg.
The game took some wild turns from here as White entered everything with a 3-3, followed swiftly by a 4-4 to build a board and here is White on roll considering a recube. Remember she leads 1-0 to 5.

Position Four


Recubes are very tricky indeed for the leader. If she doubles and gets a take, she'll be redoubled for the match with gammons not counting, so the great majority of White players holding the cube at this score are reluctant to turn it, yet another reason to give it to them in the first place!
Black can take with better than 25% winning chances as his equity at needs 5, needs 2 is 25.64%.
Here, he is just a little short of that, but White wins around 37% gammons from here, so by a small margin it is technically correct for her to play on. Her match equity is about 75.5% if she doesn't double and the same if she doubles and gets a take. If Black passes that drops to 74.64%.
Phew! Is there any way to sort all that out over the board? Not for me there isn't. I would play on here thinking myself too good and you can arrive at this correct decison just by fudging it if you say "No idea what's right so I'll take a roll!" However, once again, turning the cube is a good practical move. You score two points if you get a cash for which you pay a small premium and when Black makes a small error, your ME reverts to what it would be if you hadn't doubled!
Whatever you ultimately decide, you must get into the habit of allocating a lot of time to positions like the above. Run through a mental list of rolls, decide how you play them, put them into groups. In this position, I don't ultimately think that it is going to help you decide what you should be doing, because the differences between right and wrong are so small and the complexities are so large, but there will be positions where the process of "reading the numbers" makes your cube action very clear. If you haven't practised it a lot, with positions like this you aren't going to be able to do it in a match.
In live play you have to do this in your head and you are supposed to do this online as well, although I suspect that pencil and paper is sometimes called into play. This is actually cheating, but it isn't cheating to practise like that. Practise playing this one too, it's very instructive!
I'll bring you a bit more from this game in the next post.

BushSucks won the Fibsleague season 55 play-off for a record equalling fifth title, defeating your correspondent in a 2 hour battle over 13 points, so back to the drawing board for me. Until the next time, enjoy the game!

Monday, 20 February 2012

Backwoods v. zyxtcba part 6

More news from Fibsleague. Your correspondent will top Master A with a 9-3 record, but the battle for the second play-off place is very strong. PHunter, BluNick and Zbyszko are already in the clubhouse with 7-5, but BushSucks and jackdaddy are on 7-4 and roadkillbooks and Prae can also get to 8 wins if they complete and win all their remaining matches.
Over in Master B, MasonVerger, runnerup and blotsalot are all done with an 8-5 record, but wordman and Magic_One can still also reach this figure, while stukatz (currently 6-4) and Backwoods (6-3) can even reach 9 or 10 wins, so anybody's guess who will make the play-offs here. Six days to go! If you don't already play in the league and would like regular tough matches, this is a good time to join with the new season starting at the beginning of March.

In the master's top 12 play off for 2011, Schigolch (Germany) has eliminated Mano, the last Frenchman standing, 2-0 and now meets PHunter (Switzerland) in the quarter-finals. In the only other tie started, BushSucks leads fellow-German masselkopp 1-0.
Thanks and much kudos to Franck del Rio (Tomawaky) for ten years running the best league on the Internet.

Now some more cube action from zyxtcba v Backwoods. We're in Game Nine with zyxtcba leading 7-5. Neither side has had a correct double up until now, but a double hit from the bar and a partial fan has left zyx in this position.


It's hard to imagine anybody taking this and looking at it now, I suspect that all of us would vote to play on here. Zyxtcba (Black) chose to double and White gratefully passed. It's easy to be critical with hindsight. The pressure of the match is something we can't factor in and this sort of panicky cube afflicts a lot of us after a game where the the pressure has been on for some time and we've suddenly leapt ahead. Maintaining a dispassionate and objective view at all times is a key skill, although easier said than done!

In the next game Black made a similar, although less clearcut mistake.


Black has a very solid position here, while White is in complete disarray. Again, nobody takes this as White and although Black often has to cash this later he should certainly play on for now. Should I double or should I play on for the gammon? Rather like "Shall I have Moet or would I prefer Veuve Clicquot?", this question is a pleasant one for a bg player, although it's often a tough call. Take your time over it. Savour the moment. Try to view it from the opponent's point of view. As White, you really want to give this one up I think. Hopelessly outgunned for race and position, you have to be pleased to escape from here only losing a point.

Now Backwoods (White) trails 5-9 to 13 and he should be very alert to any cube opportunities. He badly needs to win 2 or 4 points to get back into this and if he cubes aggressively, his chances of being recubed are of course very remote. One consolation for Black is that if he can take and win a gammon, that neatly wins the match, but White must take that chance. This position looks like just such an opportunity. On roll should White be doubling and if he does, can Black take?


We'll look closely at this one in the next post, which should come rolling out of the shop tomorrow with any luck. Until then, enjoy the game!

Friday, 27 January 2012

Advertising.

I'm sorry that you haven't had much to look at these last few days. Sometimes inspiration dries up, sometimes I research some positions and then find that in fact they are not as interesting as I first thought, sometimes I write something and then find that even I am falling asleep while reading it! However, enthusiasm is welling up again and I have some nice themes to look at this week. Hit or make the 5 point, an ever-recurring problem, some ways of looking at race cubes for beginners and how to make the most out of playing against bots. That's all in the next few days while I sit around with my leg up after having my varicose veins stripped (recommended for masochists and anaesthesia fans).
In the meantime, I want all of my British readers to mark a date in their diaries, for the annual Scope Charity tournament at the RAC Club on 26th February. This is a superbly run (Mike Main and Peter Bennet) day out in a fabulous venue, with a champagne reception, the best brunch you will ever eat, auctions and of course backgammon. It benefits Scope, the Cerebral Palsy charity and you will have a terrific day out and may even win something. More details at this url .

My annotated matches are still available at $10 a go.
Mochy v Falafel, 13pts. The two best players in the world playing at world champion level.
Mochy v Melzi, 13pts. Mochy takes on Carlo Melzi, the world class Italian.
Mochy v Peever, 13pts, Mochy v Paul Weaver, the world class American teacher.

All the significant plays rolled out and interesting positions annotated by me, with some comments from Mochy. Specify XG, Gnu, Snowie or Word doc.
payPal to dorbel(at)gmail(dot)com.

Finally, personal lessons are always available for all levels below expert. Based on your actual matches and focussing on the areas that lose you the most equity, these are only 20 euros a lesson. Think they might suit you? Ask for a free trial!

Finally, the best online league is Fibs League . Join anytime and usually start straight away. Well run, good fun, recommended.

That's it for today, tomorrow I hope to have something for you that isn't advertising! Until then, enjoy the game!

Wednesday, 20 July 2011

Which Point Should I Clear?

I promised you some cube positions from a private lesson today, but I just want to polish those a bit before putting them in the window, so here's a nice position from a Dutch reader. It's a money game, how should Black play 5-4?


Actually, the first thing to note about this position is that for money, Black should have doubled before this roll and presumably for several rolls before that, because money games are invariably played with the Jacoby rule, which states that you can't win a gammon unless there has been a cube turn. This is a huge pass, so Double/Drop. What about for match play? Curiously this is a very valuable match play reference position, where Black's equity is 1 point whether he cashes now or plays on for a gammon. As doubling secures the point for certain and playing on is worth a theoretical point that will require some skill to acquire, then to me, doubling is clearly correct. Worth remembering this one.
Now to the play. Lucas, playing Black here argues strongly for 7/3, 7/2. His reasoning is that he doesn't want to clear the 7pt later against direct contact with the anchor. If he plays 8/3, 8/4 he can see that 6-5, 6-4 and 6-3 next turn will leave a direct shot and that even if that is missed he has lots of bad sixes next turn as well. It's worthwhile to quantify the immediate risk to start with. 6/36 shot numbers multiplied by 11/36 hits equals 66/1296, a 5% chance of being hit in other words. Obviously playing 7/2, 7/3 reduces this "next turn" risk even further, but it does bury two checkers deep in the board, increasing the likelihood of leaving shots later when Black has to clear his stripped high points. In other words, clearing the 7pt first is less immediate risk and more later risk and as it happens, the two balance out almost exactly! It doesn't really matter which you play.

A subsidiary question. If Black plays 8/3, 8/4 and then on his next turn leaves a shot on the bar which White hits, can White double (or redouble) while she still has a checker behind Black's five prime? It depends on how much time White has left in which to throw the escaping 6.


It might look like this, if Black cleared the 8pt, White threw 6-4, Black left a shot and got hit with another 6-4. This is exactly a marginal take/pass so more timing for White, Black should pass, less timing and Black can eke out a take. It's much the same for a recube if White owns it. I assume the start of a longish match, but of course scores may radically affect either decision. Again, an excellent reference position to remember. If your brain works in that way, you might like to collect these two and start a collection for revision sessions.
Nice position, thanks Lucas. I quite like this close focus on a single position, rather than looking at three or four at once. Is this better for you too? Let me know, feedback is always appreciated, even if negative.
Until tomorrow, always a notional concept in this blog, enjoy the game!

Monday, 4 July 2011

Champagne Answers

So let's see some answers to our mini-quiz.
Here's the first one, 0-0 to 13, Blue on roll.


Blue is too good to double, although not by a huge margin and of course White should pass. Blue will have to constantly re-evaluate this and usually ends up doubling later. One of the nice things about using a bot (in this case Gnu) to rollout a position, is that it can tell you how many wrong takes you would need in order to make the double correct. Here, the figure is about 15%. As I can't imagine anybody taking this, playing on has to be correct.

Here is Blue re-evaluating two turns later.


Pretty clear that Blue still has a strong double, but is he too good? By the narrowest of margins, an infinitesimal 0.015ppg, he is too good, so this is a nice reference position, one where you can't really make a mistake. If I find myself uncertain whether I am too good to double or not, then I always turn the cube. If it's a small mistake, as here for example, then it does at least put a point on the scoresheet. To me it has to be worth paying a small price to score a concrete point that I don't need to play for. Moreover, sometimes they take and then of course you are very happy! Gnu kindly points out that a 3% chance of a wrong take makes the double correct, so if you can imagine that there is a 1 in 33 chance of a take, then cubing is right. The last factor that you have to consider in these "Moet or Veuve" moments is, "How good is my opponent?" Actually, the White checkers here are being played by a World Champion, so nailing the point has to be correct I think. Against a very weak player, I don't know. Playing on allows for the possibility that he will make lots of weak checker players, but doubling allows him to make a huge blunder right now! It's your call really.

Now for the really tough one.


Blue doubled this one from the bar, correctly as it turns out. He is just inside the doubling window and can lose his market with a good sequence. It's very important to remember that market losers are a sequence of rolls, one for either side and also important to be clear that that sequence doesn't have to be very dramatic. In this position just anchoring can be a winner for Blue if White doesn't answer with a very good roll.
This one really divided a very knowledgeable gallery, with a surprising (to me) number going for double/pass, but the take is very clear. Not only is Blue on the bar, but he hasn't yet made his crucial 4pt and if the worst comes to the worst, White is at least anchored, so will be in the game right to the end if he wants. Excellent double though; over the board I wouldn't have doubled if I had got to this position, which I wouldn't have done because I would already have cashed and be playing game two!

I'll try and find you some more positions from this match, as I am currently working through a full annotation of it. Until tomorrow (possibly) enjoy the game!

Thursday, 16 June 2011

Double or Too Good?


Here's where we left it, Blue on roll trailing 5-away, 7-away and White on the bar. This is a very strong double and a clear pass. In round numbers, Blue can expect 71% wins from here, including 29 gammons. Blue has a lot going for him, viz. one white checker on the bar, shooting at a second blot, a better anchor and 9 checkers lined up to make the vital 5pt. Should Blue indeed play on for the gammon? It's possible, it's a very close decision, with Blue gaining minutely in theory if he plays on. In practice though, he will have to play very well to achieve the theoretical equity and he will also have to recognise the exact point when he is no longer too good and double if his game deteriorates a bit. This is asking a lot and I always double if I think it is close. Why? If you are wrong and they pass, at least it scores a point without having to play for it. This has to be worth a small piece of theoretical equity. Furthermore, sometimes they take and then you are in clover. White, a 1900+ player on fibs took this.

Then I rolled 3-2.


I chose making the 5pt, but that is a small error. I need to play 21/18*/16. A roll of 6-3, yes, make the 5pt and hope to pick up the blot next time, but giving up the bar to make the 5pt here is just too loose. The bar is still very important and I have three active builders to hit loose on the 5pt next turn if needed, or of course make it. I find that I often make mistakes, sometimes big ones after a double and take. Perhaps when my cube is picked up I just need to take stock a bit.

Then we got to this position.


This one comes up a lot in various guises. Do I carry on with the great escape from the back? Do I wheel anothe builder up to bear on the 3 and 2pts? It's a balancing act, comparing how easy is it to escape with how much another builder really gains. Have a think about it and we'll have another look tomorrow, when I'll show you a cute shorthand trick for counting the number of rolls that make the next point.
Until then, enjoy the game!

Monday, 23 May 2011

The Bear-In, Part two


Here's our cliff hanger from the last post and as Ah Clem suggests, leaving a checker on the 12pt will activate 4-4 to save the gammon. 12/8, 10/7 achieves the same thing. This will save the gammon in another 31 games in every 1296, not many I know but looked at another way it increases your gammon saves by 50%! Presented as a problem, it's not hard, but would you have taken the trouble to sort this one out over the board? That's for you to know and us to wonder as they say.

Today I want to look at bear-ins where we can still win the game and we'll take a quick look at the cube in passing as well. All of these are from a live match with me playing Blue. We are only going to scratch the surface of course. It would need a chapter or two to do it justice, but I'll try to cover the main heads.


Position ID: xv6ABwAZ7w0GAA
Match ID: UYmkATAAUAAE
Blue leads 10-3 to 13 and before the roll led the race 101 to 108. This is not quite enough for an initial double at this stage, even though Blue will win about 70% of the games from here. I want to look at race doubles in greater detail on another occasion, but the simplest way to look at these (and accurate enough for most purposes) is that a lead of 8% of the leader's pipcount is considered enough for an initial double, 9% for a redouble and that the trailer can take with a 12% deficit. A pip or two less and Blue would be in doubling territory.
Now, how to play this 1-1? If we were just racing to save the gammon then 7/6(4) is the best play, four cross-overs and no wastage. We can do better than that in this situation, but first let's see why 7/6(4) is wrong. When we start the bear-off, we want to avoid two evils, which are gaps and stacks. By bearing in intelligently we can fill the gaps and avoid putting more checkers onto points that are already over-crowded. I actually played 7/5(2) here, but 7/6(2), 7/5 is as good, the extra cross-over making up for stacking the 6pt. This use of an odd one to fill the 5pt is very common, so look out for it.


Position ID: xv5CBgCZvQ0GAA
Match ID: UQmvATAAUAAE
I think just about everybody would play 13/7, 13/10 here and you can't fault that, but equally strong is 8/2, 7/4, filling two gaps and coming with the subtle benefit of stopping White clearing her midpoint with a roll that includes a 1! Not all gaps are equally bad, but by far the worst place for a gap is the 4pt, particularly when there are a lot of checkers on the 5 and 6pts. When the 4pt is empty for the bear-off, then not only do you miss with a four, but all the fours have to be played to the 2 and 1pts, which is not a good place to have a lot of checkers. Why? Because unless you throw lots of ones and twos, then these points will eventually have to be cleared with larger numbers and in the process waste pips. This is why generally speaking we avoid bearing in to the lowest points if we can. It's a nuisance to miss with a one or a two of course, but these small numbers can usually be used very effectively to fill a gap or smooth out a stack.


Position ID: ZvcHAQDZ7osAAA
Match ID: UQmnATAAUAAE
10/4, 7/6 is obvious of course and I actually played 10/4, 6/5, but the best play of all may be 10/4, 3/2! Using the 1 to make a cross-over is, as we have already seen not always the most efficient way to use it so 3/2 is quite clever. It means that we won't miss with the first two and although it means that the 3pt is now dangerously thin, we don't need to mind so much because after the first three, we can fill that point with checkers from the obese 6pt! A stacked 6pt and an empty 3pt have a sort of symbiotic relationship that works quite well.
The difference between all of these plays is very small. There are no huge mistakes to be made bearing in with no contact, so just follow the general rules. Try to avoid gaps, with the 4pt being the worst gap, the 1 and 2pts the least damaging. Don't stack too many checkers on a single point if you can help it. The 4pt is the best place for a stack if you have one, the 1 and 2pts the worst.
That's about it really.
In the next post we'll look at bearing in against contact. Here there are some big mistakes to be made, because of course leaving a shot and being hit is usually a disaster. See you then.

Tuesday, 3 May 2011

The Big Quiz, part 7


White leads 1-0 to 5, should Blue double?
Technically the answer is no. Rollouts show that Blue will do better if he waits until he clears the midpoint. However, doubling now is only a very small mistake and if you are playing a stronger player, this is one for you to double at this score. If you get lucky and clear the midpoint, you've usually lost your market. There isn't any great skill involved here, so White isn't going to be able to outplay you and she isn't going to be able to redouble you unless she gets a shot, hits it and puts you in the air behind a five prime. Best of all perhaps, doubling now means you can't make a larger mistake and fail to double later!
Bots (and most humans) don't like to double against the bar anchor, but it is often only a small mistake, as here and if you have some spares and this sort of lead, it's often right. 2 points for selecting no double, but 1 point for a double I think. Always a take of course.
In the match I didn't double, rolled 3-3, 13/10(2), 11/8(2) and cashed next turn.

That made the score 1-1 and after a fairly routine opening, we came to this position. What's the correct cube action for both sides here?


Position ID: 2D2GASSwbxPBAA
Match ID: cAmgABAACAAE
Score, 1-1 to 5, Blue on roll. Cube action?

Until tomorrow, enjoy the game!

Monday, 2 May 2011

The Big Quiz, part 6


Position ID: 2C7iATA2nsEDIA
Match ID: cImqABAAAAAE


Blue leads 126 - 153 before the roll, so it is pretty clear that he should try to get into the race. He can't just sit on the 24pt and let White extend her prime. Usually this means 24/17, leaping White's little prime and keeping the shots down to 23. Here though, 24/22, 13/8 is equally good. Not only does that smooth out the builders on Blue's side, but you will notice that fours and threes are duplicated, being the numbers with which White would like to split. One point for either play, a point which I can't claim as in the match I played the frankly awful 13/8, 13/11! This comes into the category of "Surely I didn't really play that?", which players offer as a defence when their match is recorded by hand, but javafibs doesn't lie and I made this very horrid triple blunder. Oh well, I've done worse before now.
Then the game went ....
White 5-3, 13/8, 10/7
Blue 6-2, 24/16
White 3-3, 24/18(2)
Blue 3-2, 16/11
White5-1, 13/, 6/5
Blue on roll in the position below. What is the correct cube action for both sides?


Position ID: Np5jBgDYbYPBAA
Match ID: MAGgABAAAAAE

I really think that you must learn to count pips for yourselves and these positions are a great opportunity to practise. Use pencil and paper if you must, you will soon get the hang of it. Championship level players can do this in under 15 seconds, in their head and it is an essential skill. Should Blue double? If he does, should White take? We'll find out tomorrow. Keep the comments coming and until then, enjoy the game!

Wednesday, 10 November 2010

Mochy v. Birkhahn, Game Five.

Mochy v. Martin Birkhahn game Five, Mochy (Red) leads 6-2


1. RED: (6 1) 13/7 8/7
WHITE: (6 4) 24/14
2. RED: (6 2) 24/18 13/11*
13/7, 13/11* is probably slightly better, so that White doesn't have good sixes from the bar.
WHITE: (6 3) bar/22 13/7*
3. RED: (4 3) bar/18*
WHITE: (6 1) bar/24 13/7*
4. RED: (5 3) bar/20 11/8


This looks good, picking up the blot from the 11pt. It's more useful on the 8pt and safer. Mochy might also have tried the more aggresive bar/20, 6/3* or the radical bar/20, 24/21, both of which appear to equal the match play.
WHITE: (6 3) 13/7 8/5*
5. RED: (6 2) bar/23 13/7
WHITE: (6 2) 13/5
6. RED: (5 1) 13/12*/7


Another good play, solid and risk free. The more aggressive 13/12*, 8/3* is however equally good. As the match leader Mochy is trying to keep the lid on the volatility, knowing that anything that smells of gammon will get him cubed, but the double hit is strong here too.
WHITE: (5 4) bar/20 24/20
7. RED: (4 1) 23/22 7/3*
Mochy goes for hitting loose behind the anchor. This might look like an unnecessary risk, but it does help him positionally in two ways. It keeps his last outfield checker and unprimes one of his back men, admittedly at the expense of a lot of shots from the bar for White. What Mochy is doing is taking the risk now rather than next turn, because Red's position will be very brittle if he plays 13/8. Actually 13/8 is slightly better according to the rollout, but the match play is only a very small mistake.
WHITE: Double


Well played by White. A minimal double but Martin alertly seizes his chance. Although he trails by a lot in the race he has all the positional advantages, both 5pts and a four-prime. Also he now has the volatility that he has been waiting for, with shots this turn. I wonder if he would have doubled if Red had made the quiet play? It would still have been correct, but we'll never know.
7. RED: Take
WHITE: (6 4) bar/15
9. RED: (5 4) 13/8 7/3
WHITE: (5 3) 8/3* 6/3
10. RED: (6 3) Can't move
WHITE: (4 2) 8/4 6/4
11. RED: (6 5) Can't move
WHITE: (6 5) 7/1* 6/1
12. RED: (6 3) Can't move
WHITE: (6 1) 15/8
13. RED: (3 1) Can't move
WHITE: (3 2) 24/21 8/6
14. RED: (4 2) bar/23
WHITE: (4 1) 21/20 6/2*
15. RED: (6 3) Can't move
WHITE: (6 1) 20/14 7/6
16. RED: (6 1) Can't move
WHITE: (5 4) 20/15 6/2
17. RED: (4 3) Can't move
WHITE: (3 1) 15/12 14/13
18. RED: (2 1) Can't move
WHITE: (5 1) 20/15 12/11
19. RED: (5 4) Can't move
WHITE: (2 1) 15/12
20. RED: (6 5) Can't move
WHITE: (5 3) 12/9 11/6
21. RED: (3 2) Can't move
WHITE: (6 1) 13/7 6/5
22. RED: (3 2) Can't move
WHITE: (3 2) 9/4
23. RED: (6 6) Can't move
WHITE: (6 3) 7/1 5/2
24. RED: (5 1) Can't move
WHITE: (4 3) 6/2 6/3
25. RED: (5 1) Can't move
WHITE: (6 1) 5/off 5/4
26. RED: (6 5) bar/19 bar/20
WHITE: (5 4) 4/off(2)
27. RED: (5 5) 20/10 19/9
WHITE: (5 5) 4/off(2) 3/off(2)
28. RED: (6 4) 10/4 9/5
WHITE: (5 3) 3/off 2/off
29. RED: (4 1) 8/4 7/6
WHITE: (6 2) 2/off(2)
30. RED: (5 1) 8/3 7/6
WHITE: (2 2) 2/off 1/off(3)

..........and White levels the match at 6-6. Nothing Red could do there after the take, while White played faultlessly throughout and timed his cube perfectly.

Friday, 17 September 2010

When Safety Isn't Safe


The score is 0-0 in a three point match, Red to play 3-1.

Once your opponent has made her 6, 5 and 4 points, you can expect a powerful and gammonish cube pretty soon, particularly when, as here, she has put you on the bar in the process. This is particularly true at the start of a three point match, where the initial cube is more powerful than usual and you often have to pass cubes that you could take for money. So, I rolled 3-1. What would you do with this?

I played bar/24, 13/10, a gut instinct play that responds to blitz fear, i.e. I'm in trouble here, let's anchor and try to ride it out. Unhappily, this is a very weak play, a large blunder. Easily the best play here is bar/22, 24/23 and if you played that (and would have played it over the board) well done, great play! Can we see why this is best?
White has achieved this powerful little block using only checkers from the 8 and 6 points. This is of course very efficient, but it leaves her short of ammunition to continue the attack, so stepping up to the best available points is not as dangerous as usual. However, no need to come under the gun, even such a small gun as this, unless there is a point to it, so why should we make this aggressive and risky play, rather than just anchoring? It's because White has left herself with five checkers on the midpoint and one on the 8pt, a notoriously weak formation that is difficult to develop. If Red plays bar/24, 13/10, then White can either hit one of the outfield blots or bring checkers down from the midpoint to strengthen her forward position. Playing bar/22, 24/23 reduces her chances of hitting in Red's outfield and increases the coverage of White's outfield, forcing contact and action now rather than trying to postpone it until later.
Don't like this? Set up the pieces and play it a few times. The difference between the two plays is so large that you should see better results from the aggressive play very quickly. Note that White should double any play and Red should take, even if he has made the weaker move. Before computer programs arrived to take the strain out of rollouts, we used to do them by hand, ideally with a friend to ease the labour and provide idea input. Our rollouts were not very accurate in terms of results, but we did learn how to play the position, something that we lose when we use the bot to do the work. Give it a try and until the next time, enjoy the game!

Friday, 4 June 2010

More About Flags

Well the last post engendered an overwhelming response of precisely zero comments. No doubt the fact that it was dull, badly written and featured a not-very-interesting position had something to do with it. Let's try and do a bit better on the same subject. The title by the way, "Do You Have A Flag?" was inspired by Eddy Izzard, go to http://www.youtube.com/watch?v=hYeFcSq7Mxg&feature=related to get the idea.
So, flags for stacks, take a look at this one.


It's 0-0 in a match to 7 points and Red has a 5-2 to play. He is a beginner and chose 20/13 and it was my job to explain to him why this was not the best play. "It stacks an extra checker on the midpoint, which is bad" was my response.
"Yes, but why is it bad". Reasonable question, why is it? Stacks are bad because they concentrate a high proportion of your checkers in one place, making your position less flexible and harder to improve next turn. On roll here and trailing by 40 pips, Red has four points made with spares on three of them. If he plays 20/13, he now has spares on only two points, thus giving him fewer choices next turn. Clearly making the bad stack on the midpoint worse is not the way to go.
The point of having our "Unstack Me Now" flag on the midpoint is to save a lot of thinking. That's the place that we need to play from and 13/6, or conceivably 13/8, 6/4 is the way to go. While we are at it, how about 13/8, 3/1? That leaves us spares on four points, which is definitely good, but buries a checker on the ace point, which is definitely bad. Why is it bad? Because it reduces our playable checkers from 15 to 14 and reduces choice in the same way as a stack does, but worse, because that checker can never go anywhere. You can turn it into a small asset by making the point of course, but that cuts us down to 13 playable checkers!
Experienced players will look at positions like this and see that stacking another checker or burying one is bad just by instinct, but it is a learned instinct. The point of the flag on the midpoint is to give you a short cut to the place from which your play should usually come. It doesn't replace thinking of course, but it may save a bit of mental energy.

The same player faced some more unstacking problems in the next game. here's one of them.


In the last game, Red was getting the worst of a positional struggle of the type known as a mutual holding game, where both sides held high anchors and improving position was the over-riding aim. Here Red has doubled early and has White struggling to survive, but Red must still look for positional improvement and the "Unstack Me Now" flag still flutters from the top of the midpoint stack. Red will hit with the 5 of course, but which 4? He played 20/15*, 20/16, getting those back checkers moving and of course playing with complete safety for this turn. It's not a bad play, there aren't many bad plays when your opponent has two men on the bar against a four point board, but he can do better and 13/9 is the best 4. Not only does it unstack the midpoint, but we can now find a use for two more auto signals that I find very useful. I like a neon arrow, flashing and directed at the point that I want to make next, which here is clearly the 6pt. Obviously a checker in the outfield to hit there if White manages a 6 from the bar is good. Not only that, but the entire outfield needs a large VACANT sign. Red has no points there and this is always a weakness. Making any point there will improve Red's chances of coming home safely, both to act as a safe landing point and to provide a reservoir of checkers to hit on and/or make 6pt.
Flags, neon arrows, VACANT signs, all help me to keep my attention on the essentials. Helpful to you? Let me know. Until the next time, enjoy the game!