the dorbel daily

Showing posts with label backgammon learning. Show all posts

Monday, 13 February 2012

Backwoods v. zyxtcba part 4


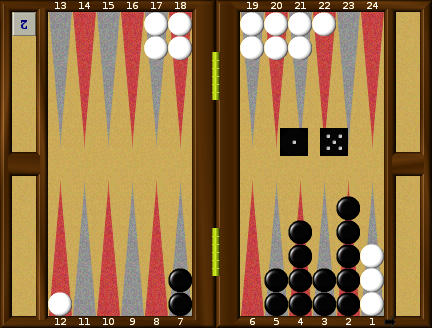
Two questions left over from the last post and here's the first, with Black leading 6-4 to 13.


Black (zyxtcba) went for 20/10, encouraged by those two blots that White has in his homeboard no doubt. Some knowledgeable commenters also liked this, but it's a blunder. At present, this is a positional struggle, with Black holding a clear advantage. He has much the better anchor and all his checkers are in play. White on the other hand has four checkers already behind Black's 20pt anchor. These are useless for priming but can suddenly become useful if this turns into a hitting contest. Abandoning the anchor initiates exactly that sort of game. My own personal rule is, if it isn't obviously right to run, choose something else! So, what else? Some commenters and also XG++ like 13/7, 13/9, an ambitious attempt to build a winning prime at the cost of two blots. Old Skool masters liked this sort of play a lot, reasoning that if you own the 20pt, you can put your checkers where you want them and damn the torpedoes. It's actually still a very sound guideline and I can imagine a world class player making this play. The other contender is 13/3, less ambitious but it retains the midpoint and the anchor and forces White to quit his anchor if he wants to hit. Subtly it also activates the two spares on Black's 6pt to do something useful. I like this a lot, moving steadily towards a winning prime with little risk. A 2592 game 3-ply rollout also makes this a small but not definitive favourite. It's hard to spot like so many quiet strong plays. Humans are hard-wired to take positive action to deal with a problem now, but in backgammon, keeping all your options open and adopting a quieter approach is often as good or better. Erroll Flynn had the big style, much preferring to swing in to the banqueting hall on the chandelier, but one wonders whether walking quietly down the stairs wouldn't have served as well. An interesting and instructive position.

White (Backwoods) also had a roll that is commonly mishandled by beginners. Here it is.


Sadly Backwoods chose the beginner play, 23/22, 13/7 but hitting on the ace is absolutely clear. White must take advantage of his stronger board and go for the gammonish closeout. This is not an isolated case. It's worth taking a bigger risk than this to try for a closeout and here it is so important to stop Black making an anchor on the ace that White should probably hit there even if he knows that Black is about to roll a one! This also comes up a lot, well worth remembering.

Other news. We're into the last two weeks of Fibs League session 55 and both Master A and Master B are coming nicely to the boil. In Master A your correspondent has 8-3 with one match to play, but everybody else has played fewer matches and nine other players can still put a run together and equal or surpass this score. In Master B Germany's runnerup is 8-4, also with one match to play (Master B has 14 players in this session) but again, most of the division will still be hoping for a burst of form to catch or pass that.
The 2011 Master Playoffs kicked off, with Schigolch (Germany) winning his first match with Mano (France). All these ties are best of three 9 pointers.

A word about rollouts. This blog attracts some mild criticism because I don't post the results of rollouts. It may be useful for you to know that I use XG for this, with 3-ply checker play. It's possible, likely even, that a higher level of play can produce a different result, but you do have to remember that players who can play as well as XG 3-ply are few and far between, so by using more advanced settings, you move into areas where no human can play well enough to achieve the theoretical equity. As the differences usually amount to a few hundreths of a point of equity, the value of a more accurate answer is limited anyway. I've also found that posting rollout results is boring and counter-productive, as they stifle debate. I would rather listen to our correspondents discussing why they would make a play any day, even if they are wrong!! Backgammon isn't about knowing what the right answer is, it's about knowing why the right answer is right, so that when in future we meet something like it, we have something to base a play on.
Anybody can do rollouts and I am always pleased to hear from somebody who has rolled out a position from here and got a different answer, but I won't be posting mine.

I'll have some more action from Backwoods v. zyxtcba tomorrow, perhaps even later today, so stay tuned. Until then, enjoy the game!

Tuesday, 10 January 2012

The Answers Part Two


The answers for Numbers 6 to 10

Position 6


Money game, Black to play 3-3.
The plays that include 5/2*(2) do very badly in the rollout. Switching from priming to blitzing when you have already cubed and you don't have the ammo in position for the attack just isn't the plan. That solid 7 to 4 block is Black's big asset and shouldn't be traded away. Rather surprisingly Bill Davis and Danny Kleinman liked bar/22, 13/10, 5/2*(2) back in 1990 and so did Barclay Cooke when he showed the position as No 102 in Paradoxes and Probabilities. That's a shockingly bad play and so is hitting twice! So, what's best? It's probably one of these, either bar/22, 21/18*/15, 13/10 or bar/22, 24/18*, 13/10. The rollout hasn't split them yet. If it does I'll let you know and for now I'll allow either as the winner. Two entrants got the first of these.

Position 7.


Money game, Black to play 5-1.
All good quizes need a position like this. The answer is of course 7/2, 7/6, for minimum shots and to avoid the 6-6 disaster next when not hit.
Two entrants got this right.

Position 8.


Make the play of 6-6 that leaves the fewest shots.
Dead sneaky this one. The answer is 14/2, 10/4(2). This appears to leave 11 shots, but actually only leaves 5. You have to play the full roll if you can, so White can't hit with 6-1, 4-1 or 2-1!
Only one entrant got this right and he was honest enough to say that he had seen it before and remembered the trick.

Position 9


Money game, Black to play 1-1.

2/off(2), More wins, more gammons, more backgammons. It does leave a big mess after rolling a 1 next turn, but for that to hurt you have to roll a 1, get hit, hit back and then get hit. That's 30% x 30% x 30% x 55% = somewhere between 1 and 2% and even then you haven't lost as you own the cube. Gumpi also cleverly points out that playing 2/1(4) creates 2-1 as a blot number next turn. Only one entrant got this one right.

Position 10


Money game, Black to play 5-3.
24/21, 9/4. When you have to leave a blot, or as here blots, put them where they will do most good if not hit. This play at least puts the blots on points that Black really wants. 11/8, 9/4 is the only alternate that comes close on XG++ but I admit that I haven't rolled this one out yet. Our experts from 1990 also picked this play and 3 of the class of 2012 also nailed it.

So after all that, who won? Stiefnu scored a brilliant 7/10 just squeezing in ahead of Timothy Chow who totalled an excellent 6. Well done all of you and thank you very much for taking part. This blog is nothing without you. If Steve sends me his address I'll send him his wonderful prize, which I just know he will treasure.

Until the next time, enjoy the game!


Monday, 17 October 2011

More Answers For The Famous Five

These are the rest of the answers to the Famous Five Quiz. If you haven't seen that, go back two posts.
Here's Position 3. It's a money game and White has the cube, Black to play 2-1.


I really like this one, because it illustrates a point that many players overlook. All our panel went for 24/22, 14/12*. Alertly they had all spotted that this gives Black sixes and fours to escape, as well as several combinations of numbers to make the bar point. To be honest, I might have made this play too, but it is in fact an error, costing 0.05. Why so? Because it ignores the fact that before we can carry out our threats to escape or make a five prime, White gets a turn. The panel's play works brilliantly when she dances, but when she enters she has 21 numbers to hit Black off the 3pt. Her board is as strong as ours and she has an anchor, we don’t. When that works for her, our blots in the outfield are a liability, not an asset. When we stay back and button up in the outfield with 14/12*/11, she doesn’t have any of these options. With some numbers (64, 44, 42, 41 probably) she will hit us off the 2pt, but that is in any case less dangerous than being hit on the 3pt.
This is not by any means a typical position. The diversification that seduced the panel is a good basis for attacking any problem. It doesn't arrive at the right answer here, but we all might have got it if we had taken the trouble to think about what White's roll might contain.
Oh yes, how does making the five prime look? It looks like a double whopper with fries. Life threatening.

Then we come to position 4, with Black to play 3-1. Black must hit of course and look around for a three. Actually I say "of course", but one of the panel chose 8/5, 8/7. This blunder won't do. Black can't really hope to keep White at bay with that weedy 14pt anchor, although he will have a take when White doubles.
How did the rest do?


Two of them chose 14/13*, 8/5, nicely diversifying the 8pt stack. This leaves 19 return shots at three blots, 3 of which double hit. Our fourth panelist chose 14/13*, 4/1, keeping the shots down to 16 with only one double hit. This is of course good, but the ace point is just not where you want your blot to be. Both these plays are blunders. White should double from the bar and Black will have an unpleasant take. Our last man standing went for 14/13*/10, alertly giving himself sixes as another cover for the 4pt. Again though, just like position 2, White gets to play first and this play gives up 19 shots, including three double hits. Actually it's five, but White won't double hit with 4-2. This play is much better than the rest, except for the best play of all, which is 14/13*, 14/11. 17 shots and two double hits and this combination is the winner. After any play White should double and Black will have a take, fairly easy after a good play and unpleasantly close to a pass after a bad one.

Position 5, with Black to play a 6-4.


One panellist opted for the "safe this turn" play 8/2, 6/2. It's not a bad play, but it burns two of Black's three spares in order to make a weak point behind the anchor and leaves Black with TMP, Too Many Points. Avoid making seven points if you can. It's very inflexible and leaves you with a lot of numbers that leave a shot next turn. Another tried 13/7, 8/4, which got my vote too, pretty positive and with lots of returns if White can hit. However, it doesn't address the main feature of the problem, which is that Black is going to have to leave his anchor in order to get into a doubling position and with this roll he should try it now. He has a small lead after the roll and a better board, but the main argument is that this is just the least bad 6! If he is going to leave shots, it may as well be in pusuit of his main aim, which is escape. One panellist went for the wide-open 22/16, 13/9, but best of all is 22/16, 8/4, the choice of two of our guests.

Many thanks to those brave souls who put their opinions on the line for us, heroes all. Why don't you have a go too, the next time we have a quiz?

Until the next time, enjoy the game!

Friday, 24 June 2011

A Tough Call For Ducks.


This is where we left it in the last post. Blue leads 1-0 to 5.
I tried 10/4, 5/3, which clem also suggested in his comment. It's a blunder. Like him I thought that I would try to hold onto my bar pt as long as possible, but in practice this just isnt realistic. Its worthless when White hits and when she doesn't, White will find a play on the other side of the board and I will then have to break the bar anyway. Best to do it now and make the 3pt, 7/3(2). Usually better to make a point than slot it and a five prime is not to be sneezed at. I even get some safe sixes to play next turn! The score is the key here. The most important feature is that Blue can't risk having a fourth man sent back. He may be hit this turn and after the match play he is more likely to be hit later too! The match play is probably correct at dmp but loses many more deadly gammons here. As it happens, White rolled 6-6 next, crashed and my blunder worked brilliantly! That's bg.


I think most of us play with ideas in our heads that are a shortcut for thinking. Here's a fascinating position from a match I watched on gridgammon.


It's 0-0 to 5. Blue is a beginner and she got it very wrong. See if you can do better and tell me the answer. I'll let you know what she tried and what she should have done tomorrow and I do mean tomorrow. I know that sometimes days go past in between posts. Be patient please, life sometimes interferes with backgammon.
Until tomorrow, enjoy the game!

Thursday, 9 June 2011

Double 'Em In!

In my last post I offered the comment, not original, that the player playing on for a gammon against an ace point anchor is either making a mistake or has already made one. Of course we can all think of exceptions to that. You can suddenly go from "no double" to "too good" in one jump after a big joker sequence, although this is rarer than you might think. Also, the leader in a match often doesn't have a double against an ace point and we'll see an example of that in a minute.
Here's just about the earliest that you can expect to see an ace point double. White opened 2-1, played 13/11, 6/5 and got whacked with a 6-4, then had the misfortune to roll 6-6!


Do you double this? You should, for money and at 0-0, it's already in the window. It's a comfortable take, but weaker doubles than this get passed every day. If Blue trails in the match, the double gets stronger as the lead gets longer and White will have to pass at the GammonGo scores (4-away, 2-away and 3-away, 2-away). As soon as Blue leads though, he isn't quite good enough to double and should wait for a second good sequence before turning it. At 2-away, 1-away post-Crawford, this is one of the positions where Blue should play on for a gammon, although of course at that score, White would hardly have played 13/11, 6/5.

Here's a more orthodox doubling opportunity for Blue. He's escaped his runners and made a point, so although White has a better board, this is the time to turn it.


A regular doubling opportunity, just in the window. This is about the minimum that you need for a cube. Blue leads 127 to 145 and his main threat here is to make the 5pt. If he can do that White will have to pass. Blue's path home is far from straightforward and this puts people off doubling. White can still catch up in the race, improve his anchor to the 20pt or bar, hit a fly shot and if push comes to shove, win with a late shot from the anchor, so it's an easy take, but this is the sort of game where as Blue, you want the cube to be on 2. As before, if Blue is the leader in the match, no harm in taking a turn, if he trails the double gets stronger.

I hope that you have already gleaned the priceless information that the score is a very important consideration when cubing ace point games. Here's an example that as Blue I feebly passed in a recent GridGammon match. White leads 6-0 to 13 and cubes.


At 0-0, Blue should give this one up, although a take is not outrageously bad. Trailing badly, this cube is a steal and White should not even be doubling. White is an underdog to cover his blot, hasn't made his 5pt and is a bit over-extended at the front, with no points made in his outfield. If Blue can get a checker onto the 20pt, or ideally make it, he has a great game. Why, you may ask, did I pass this one if it is so obvious? Like many people my game tends to be influenced by recent experience more than it should. Several times recently I've taken cubes as the trailer that are money passes and for match too and I just didn't take enough time to really examine the weak points of White's game. Note too that although White's double is technically wrong, he only needs around 10% wrong passes to make it correct and I bet that that is a good estimate here.

One reason why I have delayed this post is that it took me quite some time to find examples of ace point anchor games. There's a reason for this. Strong players don't often get caught in them, because they split the back men early. It is very important for weaker players to imitate this. Delaying the split usually makes for a harder decision later, so break them up early, on the first roll if you can. It will make for easier games for you. Don't be put off by the times that you get blitzed. The alternative, being caught in an ace-point game is worse.
The last tip for today is this. It's tempting for a lazy brain to look at the position, think "Ace point anchor? Pass" and move on. Train yourself to look at every checker on the board before making your decision. The last position above is a very good example of this. Do the hard yards as they say in sport now, a good work ethic pays.
Until the next time, enjoy the game!

Monday, 6 June 2011

More Bear-in Stuff


Here again is the position I left you with in the last post. Blue is on the bar and on roll. Blue was playing on for a gammon until he got hit but he isn't too good to double now and he should turn the cube. I don't expect that's a big surprise for you, but White has a clear take which may well be. Blue has only 14 numbers to hit and when he misses, he has five blots to tidy up. Even when he hits, White still has some sort of game if she can enter quickly. In round numbers, Blue is going to win about 64% from here including 30 gammons and a pass by White costs her about 0.2ppg. The play is going to be difficult for both sides, as you will find if you play it for a bit and I recommend that you do that. Of course Blue hit, White dance is pretty straightforward but when Blue misses the fun really starts. Blue will have lots of "Which point(s) do I make" problems, while White will have to decide how much risk she wants to take if she gets a shot. Don't forget also that this is the first game of a five pointer, where the cube is very valuable to White. She can redouble earlier than usual because Blue's point of last take is unusually high. He needs about 28% cubeless for a take.

Now I did say that I was going on to look at 23pt anchors in this post, but before I do that, I just want to talk about doubling against deep anchors. The 24pt anchor on its own is almost always a pass if the attacker has freed his back men and made some useful points. This is regardless of the race. A lot of people play on for a gammon against an ace point, but it's true to say that if they are doing this, they are usually either making a mistake or have already made one. I speak here of positions where the anchor has only two checkers on it. If there are three or more, or if the anchor is combined with another checker on the bar, things may be different. You may be able to double these before your back men are free, or if they have escaped, you might be right to play on for an undoubled gammon. Three men on an ace point anchor is a terrible thing to have and strong players often ship early cubes on the strength of this alone!
The 23 pt anchor is a slightly different beast. It generates almost as many shots as a 24pt anchor but gets gammoned less and if the side bearing in has a couple of points left to fill, it can be surprisingly resilient. It can sometimes be a take, with or without racing chances, because it covers the outfield better and the side bearing in has both the 8 and 7pts to clear against contact.
I'll dig out some samples of cubes against ace and deuce anchors and post them later.
Thanks for reading, enjoy the game!

Thursday, 12 May 2011

Cube action?


Let's deal with this one first. It's pretty clear that Blue's priority is to get those back men moving around the board and while White is on the bar is the best time to do it. No pussyfooting, 23/18, 24/21 is the play. There's more to this than getting ready to escape. If White gets lucky and throws a joker from the bar, then spreading out will maximise Blue's chances of a return shot and Blue outboards White 4-2 at the moment. 23/15 is second best and anything that breaks the midpoint is very wrong indeed. It is a key point, covering the outfield and a safe house for runners, only to be broken if it can be used to hit.
I'm a bit bored with this match now and if I am bored with it, you must be weeping. So, here are two nice positions where the cube action is not at all clear. Let's see what you make of them.


Position ID: drsJAAZ7Y4cBAA
Match ID: cAkgARAAEAAA
Blue leads 2-1 to 9 and is on roll. What is the correct cube action for both sides?


Position ID: t5sHAEBt2wiAAw
Match ID: UQmgAUAAMAAE
Blue leads 6-4 to 13 and is on roll, owning the cube. White is on the bar. What is the correct cube action for both sides?
Set them out on a board, take your time and a very good tip this, imagine that you are trying to convince a doubles partner why your play is best!
Let me know what you think. Until tomorrow, enjoy the game!

Friday, 14 May 2010

Making The Most of What You've Got

Many people associate playing better with learning more. "I really must read a book/ study more/ swat up on the cube" etc. Well it is true that improvements in technique can only help, but I think that everybody who plays below World Class level, that's 99% of us, can play very much better just by making better use of what we already know. What we need to do is organise our approach to the game in such a way that what we know is at the surface and available when we make our play decisions.
Like any other sport or game, preparation is the foundation. Don't rush up to your computer, log in and dash into a quick game while you drink your coffee, with one eye on the tv and the other on the clock. Not only is this a recipe for disaster in the game that you are playing, but every time that you make a careless play you are reinforcing a bad habit that will poison your play when it comes to a match that you really want to win. When it is time to play, sit at a tidy desk, turn off the tv, radio, stereo and telephone and log in. Take a moment to do some breathing exercises with the aim of clearing your mind, because all you want to think about while playing is the game.
Don't play while hungry, thirsty, tired or under the influence of adult beverages, not even for "fun". Bad habits start here.
The most common fault at every level online is to play too fast. When you have rolled, let go of the mouse! The temptation to make the first reasonable play that you see is much stronger when it's just a click away. If you have rolled a doublet, sit on your hands as well, because you need more thinking time than normal. A high percentage of checker play blunders happen on rolls of doublets.
Online, we have a very useful feature that doesn't get used enough, which is that it is very easy to try out plays to see what they look like. We can reset with a click and not run the risk of confusing ourselves, resetting incorrectly or irritating our opponent. Use this feature.
If you aren't used to thinking very hard about what play you make, you are going to tire very quickly when you start, so don't jump straight from one match into another. Take five minutes to clear your brain. You can be downloading your last match into your bot for analysis. You don't analyse every match you play? Very strong players do, imitate them.
Long ago, although for some it is still fresh I remarked that "Even a fencepost can be 1700 on fibs." My tongue was in my cheek when I said this, but it is actually true. Playing at a low intermediate level isn't very hard, easily within the compass of us all, but without application it is almost impossible! if you are under 1700 on fibs, you are either very new to the game or you don't want to take the trouble to play better. Think about this; playing better is more interesting and more fun, because you will win more, always good!
I'll talk a bit more about improving in my next post, coming soon. Thanks for reading, enjoy the game!

Monday, 26 April 2010

Crawford Rule Change?

Anybody who plays tournament backgammon will have encountered the Crawford Rule. It stipulates that when one player reaches a score one point from victory, the doubling cube may not be used for the next game. If the trailer wins the Crawford game, he can and should double the next game at the first legal opportunity. I have often wondered though, why only one game? If you have reached 10-2 in an 11pt match, but then lose the Crawford game, your opponent will be doubling every game and will effectively be handed four points for nothing! In practice, he doesnt trail 10-3, he trails 10-7 in a match where the cube doesnt count. How can that be fair?
I can see that it is fair that he benefits from winning gammons, that requires skill, but there's no skill to just turning the cube straight away. Changing the rule, so that no doubling was permitted for the rest of the match would be fairer and would incidentally, increase the wins for the more skilful player, a desirable outcome in itself. I have to say that I have yet to meet anybody who agrees with me here!
Why have a Crawford rule at all? Without it, certain cube actions at the end of the match become nonsensical. At the 2-away, 3-away score for example, if the trailer doubles, the leader can take anything at all in a gammon free position! If he passes, he is 50/50 in the match, if he takes and loses he trails 2-away, 1-away, doubles the next game immediately and is still almost 50/50, except for the leader's free drop.

For our newbies it might be good to explain the "Free Drop" and it's close relation, the "Mandatory Take". The Free Drop occurs post Crawford, when the trailer needs an even number of points for victory and doubles. The leader can drop without losing any equity. Having the free drop is worth a little bit, perhaps as much as 1.5% in match equity. When the trailer needs an odd number of points, the leader always has a take, even if he is well behind in the game. This is known as the Mandatory Take. The exception to this comes when the trailer stands to win more gammons than he loses games, but these positions are rare. However a clever trailer may sometimes delay his cube until there is a substantial gammon threat in the hope of getting a wrong pass! You have to be careful though; reaching a position where the leader really should pass would be a disaster!
Another rule change that would slightly reduce the luck factor, would be for players to alternate getting the first roll of the game. Roll dice for it on the first game, then alternate after that.
Any thoughts on these ideas? Any rule changes you would like to see? Use the comment feature and let's get interactive!

Sunday, 18 April 2010

Tables

A reader asked me if I had a table of doubling and take points for various match scores. I haven't as it happens, but I did try to make one once. The trouble is that it needs to take into account whether the situation is dead cube or live cube or somewhere in between and be different for redoubles and take gammons into account. You end up with something very unwieldy, hard to memorise and hard to use. Old books were full of various tables. It is a good way to fill up pages that you haven't already filled with lots of diagrams! In my experience though, if you want a table telling you something, best to make it yourself. It's more likely to stay in your brain, you are more likely to understand it and you can tailor it to your own needs.
Having said all that, here is a useful table for you that I haven't seen anywhere else.
It is for the particular score 2-away, 1-away post-Crawford. For the trailer, the cube action is easy, turn the cube at the first legal opportunity. There is always a bright lad at the back of the class that points out that actually, there are certain rolls that make it correct for the trailer to play on and try for a gammon. This is probably true and if you are a world class analyst who can spot this opportunity and continue to evaluate it accurately as the game goes on, then go for it. You do gain a tiny bit of equity if you get it right. For the rest of us, just turn it!
For the leader, things aren't quite so simple. If you get the opening roll, then it isn't so bad. With most things you are a favourite in the game, so you can take. The exceptions are 4-1 and 2-1, where you are slightly below or slightly above 50% depending on who you believe. If you have correctly split the back men take or pass makes not much difference either way. When however your opponent has had the opening roll you get to reply before he can double and the question is, can you take or should you pass? You need to be 50% or preferably better to take so do you know all the answers? I bet you don't so here is my version of the truth. Print it out and keep it by you for reference. Refer to it AFTER you have made your decision in a match please, not before. Before is cheating.

The first column is what your opponent rolled, the second is what he played and the then we say what you need to do to get to 50%.
I use the word doublet for 6-6 etc to avoid confusion with the cube action. All plays are numbered from the viewpoint of the player on roll. Where it says "roll any doublet" you do have to make the best play with it as well, but you will usually be better than 50% even if you don't find the best play.

6-5..24/13. Roll any doublet.
6-4..24/14. Roll any doublet or hit on the 11pt.
6-4..24/18, 13/9. Roll any doublet, hit on the 16pt or make the 7pt.
6-3..24/18, 13/10. Roll any doublet, hit on the 15pt or make the 7pt.
6-3..24/15. Roll any doublet or hit on the 10pt.
6-2..24/18, 13/11. Roll any doublet, hit on the 14pt or make the 7pt.
6-1..13/7, 8/7. Roll 4-4, 3-3, 2-2 or 1-1.
5-4..24/20, 13/8. Roll any doublet, or make the 5pt.
5-3..8/3, 6/3. Roll any doublet (except 5-5) or make the 5pt.
5-2..13/8, 13/11. Roll any doublet, hit on the 14pt, make one of the 7, 5 or 4pts.
5-2..24/22, 13/8. Roll any doublet, make one of the 5, 4 or 3pts.
5-1..24/23, 13/8. Roll any doublet or 6-5, make one of the 7, 5, 4 or 2pts.
4-3..24/20, 24/21. Roll any doublet (except 5-5), make the 5pt or 4pt.
4-3..24/20, 13/10. Roll any doublet, hit on the 15pt or make the 5pt.
4-3..24/21, 13/9. Roll any doublet, hit on the 16pt, make the 5pt or 4pt.
4-3..13/9, 13/10. Roll any doublet (ex 5-5), hit in the outfield or make the 5pt.
4-2..8/4, 6/4. Roll any doublet (except 5-5)
4-1..24/20, 24/23. Roll any doublet (ex 5-5) or make the 5pt.
4-1..24/23, 13/9. Roll any doublet, hit on the 16pt, make the 5pt or the 2pt.
4-1..13/9, 6/5. Roll any doublet (ex 5-5) or hit a blot.
3-2..24/21, 13/11. Roll any doublet, hit on the 14pt, make the 5pt or 4pt.
3-2..13/10, 13/11. Roll any doublet (ex 5-5), hit in the outfield, make the 5 or 4pt.
3-1..8/5, 6/5. Roll 6-6, 3-3, 2-2, 1-1.
2-1..24/23, 13/11. Roll any doublet, hit on the 14pt, make the 5 or 4pt.
2-1..13/11, 6/5. Roll any doublet (ex 5-5) or hit a blot.
There you have it. Will it be any use? Practise with it. Set the board up, make an opening play and then roll the response. Note what you played, then do nine more before checking your answers. Nine out of ten is a pass mark!
Let me know how you get on.

Some interesting points. You will notice the weakness of 5-5 as a response in many cases, even though it is 20 pips. Note too that at dmp, splitting on the opening roll is preferable to slotting. Note the 24/20, 24/21 play for an opening 4-3. This is still a well-kept secret best play for this roll at this score, as is 24/20, 24/21 for 4-1. As well as being technically best, people who haven't met these before don't always know how to respond.
Some of the weakest reponses that still indicate a correct take are marginal and some of those just below the line are very close. let me know if you can see any that I have wrongly included or omitted. Thanks for reading and as it used to say in the Beano, more fun next week!