the dorbel daily

Tuesday 30 November 2010

The Last Game, Mochy v. Birkhahn


So, runnerup, Martin Birkhahn playing the White checkers has jumped into the lead, 8-7 to 11.

WHITE: (4 2) 8/4 6/4
2. RED: (6 5) 24/13
WHITE: (6 3) 24/18 13/10
3. RED: (4 1) 13/9 8/7*
WHITE: (6 5) bar/20 24/18*
4. RED: (3 1) bar/22 6/5*
WHITE: (3 2) bar/20*


Up to now we've seen a standard blot hitting contest. Now White has a choice of hits and bar/22, 18/16* is best to keep the return shots down and deny Red good fours and sixes from the bar. The match play is an error costing about 0.05ppg.
5. RED: (6 3) bar/22 13/7*
WHITE: (1 1) bar/23 6/5(2)
6. RED: (2 1) 7/5* 6/5
WHITE: (5 3) bar/22 10/5


A poor effort from White. The checker on the 10pt is in no great danger and is badly needed to make the bar. Bar/22, 23/18 is a possibility but bar/22, 13/8 looks best and tops the rollout by a narrow margin. The match play is an error costing 0.098 ppg.

7. RED: (4 3) 13/9 13/10
WHITE: (6 5) 13/2
8. RED: (6 4) 8/2* 6/2


A blunder. Making the 2pt on White's head puts a man on the roof against a three point board but the price for doing this is much too high. It gives up the 8pt, an important element of his prime field and buries two checkers deep in the home board. Now he is comitted to blitzing at a time when he has three men back behind a useful broken four prime. A much better play is 24/14 and the match play costs 0.144ppg.


WHITE: (6 3) bar/22 8/2
9. RED: (3 1) 10/7 8/7
WHITE: (6 3) 13/4


Martin makes a nice looking play that keeps all his checkers in front of the anchor, at the cost of leaving a direct shot. However, the pragmatic and ugly 13/10, 8/2 is better. There are two reasons for this. Firstly White leads by 31 pips after the roll, so he doesn't need to risk losing part of that in an effort to make the 8pt. You don't need to block checkers that have no intention of leaving. Secondly, Red has got himself into another TMP position, so he has to break a point next turn if he can't play all the roll with his one spare or roll a useful doublet. He will welcome the chance to solve this problem by putting White on the roof. However, White's play is nice and pure and the position after 13/10, 8/2 is so ugly that that the match play error only costs about 0.050ppg.


10. RED: (5 3) 22/17*/14
WHITE: (4 2) bar/21 13/11*
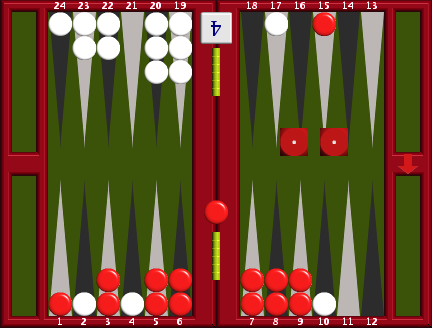
11. RED: (6 2) Can't move


This position, with White on roll and Red on the bar neatly demonstrates the importance of adjusting your cube action to the score, particularly near the end of a match. If the scores were reversed (to Red 8 White 7), then White would have a double here and Red would have an enormous pass. As it is White that leads, doubling would be a serious error and he has to play on and try for an undoubled gammon. The strength of his position is the big double threat, as 41 of his 64% wins here (Snowie evaluation) are gammons. If White turns the cube, half of the extra points that he gets for his gammons are wasted in overage and if Red redoubles, White's gammons are useless! White correctly waits.
WHITE: (2 2) 11/7 5/3*/1*
He could also have played 13/9, 5/3*/1* . The two plays come out nearly equal in a rollout.
12. RED: (3 1) bar/22 bar/24*
WHITE: (6 2) Can't move
13. RED: Double


Mochy (Red) doubles from the bar. This to me is a brilliant double, recognising that he is now the favourite (about 60%), he wins a lot of gammons (27%) and that White's three blots mean huge volatility. This cube is based entirely on the score. After White correctly takes (passing would be a very large blunder) Red's 4 points for a gammon get him neatly to the winning post. White can only use three of the points for his gammons and the cube isn't much use to him either. Redoubling opportunities will be very limited.
With careful and quiet analysis all this seems very obvious, but kudos to Mochy for spotting this opportunity over the board and wasting no time in shipping it in. That's why he's Number One in the world right now.
WHITE: Take
14. RED: (6 1) bar/18*
WHITE: (5 3) bar/22
15. RED: (6 1) 13/12*/6


A tough play for Mochy with many feasible choices. His play looks natural, but the rollout shows that it is best to hit with the 1 and play 24/18 with the 6. This is a problem that crops up constantly in situations like this. You can either focus on making points in the home board (and/or hitting) or you can use the roll to improve on the other side of the board. 24/18 locks up the escape and takes total control of the outfield and on this occasion that is a little more important than providing an extra builder for the 4pt. I often get caught out with this one too. The key questions are, "How difficult is the escape?" and "How important is it to make the home board point?"
The match play is a medium error costing about 0.06ppg.


WHITE: (3 2) bar/22
16. RED: (1 1) 9/8(2) 6/4*
WHITE: (3 2) bar/22
17. RED: (6 3) 13/4
WHITE: (2 1) bar/22
18. RED: (6 2) 24/16
WHITE: (2 1) 4/1


White eschews the hit but it is probably worth doing. A constant theme of priming battles is not giving your opponent complete freedom to play anything. If Red re-enters on the 22pt, White is no worse off. If Red re-enters on the 24pt and hits, White is hardly much worse off than he is now and at least Red will be back behind a broken four prime. The match play is a very small error at worst.


19. RED: (4 4) 18/14 16/4
Mochy elects to stay back and try for another checker, but the simpler 22/6 is probably a little better. A very small error at worst
WHITE: (4 3) 5/1 5/2
20. RED: (3 1) 4/1 2/1
WHITE: (3 2) 6/3* 6/4
21. RED: (5 3) bar/22* 7/2
WHITE: (6 4) Can't move
22. RED: (3 1) 22/19 7/6
WHITE: (6 3) bar/16
23. RED: (3 1) 14/10
WHITE: (6 3) 22/16 4/1
24. RED: (3 1) 10/6
WHITE: (6 5) 16/5
25. RED: (4 2) 19/15 6/4
WHITE: (3 2) 16/11
26. RED: (2 1) 15/14*/12


Mochy hits of course, but the best 2 may be 8/6. It's usually right to start clearing an awkward point while the defender is on the roof, particularly as here when White has a busted board anyway.


WHITE: (1 1) Can't move
27. RED: (5 2) 12/5
WHITE: (6 2) Can't move
28. RED: (5 5) 6/1(3)
WHITE: (5 2) Can't move
29. RED: (5 2) 8/1
WHITE: (4 2) Can't move
30. RED: (6 4) 8/4 5/off
WHITE: (4 3) bar/18
31. RED: (6 2) 5/off 4/2
WHITE: (3 1) 22/18
32. RED: (3 2) 5/2 4/2
WHITE: (3 1) 22/19 18/17
33. RED: (3 2) 4/1 4/2
WHITE: (5 3) 19/16 17/12
34. RED: (6 4) 2/off(2)
WHITE: (6 2) 22/20 12/6
35. RED: (4 3) 2/off(2)
WHITE: (6 4) 16/6
36. RED: (6 5) 2/off(2)
WHITE: (6 2) 20/12
37. RED: (6 3) 1/off(2)
WHITE: (5 3) 18/10
38. RED: (6 1) 1/off(2)
WHITE: (5 4) 22/17 22/18
39. RED: (4 1) 1/off(2)
WHITE: (3 1) 10/6
40. RED: (3 2) 1/off

.........and Mochy wins a gammon and the match.

I do hope that this has been an instructive exercise for you. Working through every move has taught me a lot for sure. Close examination of the moves and cubes of players of this calibre always pays dividends. Congratulations to both players and big thanks to Mochy for doing us the honour of visiting our site to play our champion.

Saturday 20 November 2010

Mochy v. Birkhahn, Game 7,

...........and Mochy leads 7-6 to 11. As with all the other games, you will get much more from this if you set up the pieces on your board to follow the game.

1. RED: (4 3) 13/9 13/10

WHITE: (3 3) 24/21(2) 8/5(2)

This is a roll that bots play badly, both Snowie and Gnu prefer to play 24/15*, 13/10. Martin knows better and takes two key points with this fine roll. 24/21(2), 6/3(2) has more safety and unstacks the 6pt, but the awkwardness after the match play is a price worth paying to get the 5pt. The blot on the 8pt isn't a great liability, as if it is hit Red will have four blots while White has a high anchor and a better board. Excellent play which the rollouts back up.

2. RED: (1 1) 24/23 10/9 6/5(2)

WHITE: (2 1) 8/5

3. RED: (5 2) 24/22 13/8

Mochy makes a small error here. It is slightly better to run out with 24/17 and not give White the chance to use his stacks for a blitz.The spare on the midpoint is very useful and worth preserving too.

WHITE: (6 2) 13/5

Good play. 13/7, 5/3* is much too big and White waits for a better attacking chance.

4. RED: (3 1) 23/22 8/5

WHITE: (6 5) 13/2

5. RED: (5 2) 8/3 5/3

WHITE: (2 2) 13/11 6/4(3)

There is no gain from playing to the 11pt, it is just a blot on the landscape. That checker is just as useful and of course completely safe on the midpoint. 6/4(3), 4/2 is clearly best. Not sure what Martin was thinking of there. He has just made three consecutive safety-first plays, so perhaps he felt that he was going to have to take some risks to clear the midpoint. There has to be some gain from a risk though and there isn't any here. Best to lock down the four point board and wait and see what happens next.

6. RED: (3 1) 6/2

No risks for Mochy. White leads in the race by 9 pips after this roll, but is about even in the game because he is behind a four prime whereas Red's anchor is behind a three prime. Not only that, leading in the race is a double-edged sword in these mutual holding games, because you may be forced off your anchor first and get attacked. Mochy keeps all his assets in place and makes a quiet play.

WHITE: (2 2) 13/9(2)

This is the play that I would have made, along with many others I expect. The bots however prefer 13/9, 11/9, 4/2. They do this because it gives Red awkward ones next turn, being unable to hit and cover without breaking his midpoint and a point in his prime. If he chooses not to hit, he usually has to break his prime. This sort of play is hard to find over the board but it is worth noting the circumstances that have created the opportunity for it. Red has TMP, too many points and has to break a point with every roll this turn. You can see that this is a condition to be avoided where possible and look for opportunities to exploit it when you see your opponent in it. The match play is a very small error.


7. RED: (3 2) 13/8

WHITE: (1 1) 11/10 9/8(2) 5/4

Hard to sort these out and know what's best. Snowie prefers 9/7(2), a useful asset on later turns and easier to clear if White can escape and get into a bear-in. The match play is a very small error.

8. RED: (6 4) 13/9 8/2

WHITE: (4 4) 10/2 8/4(2)


I don't think may of us would look beyond this "forced" play, but Snowie finds something very slightly better, which is 10/6, 5/1(3)! This creates a gap and buries three checkers which is the downside but saves two sixes and a five on the upside. This buys some valuable time for White, so that he isn't forced off his anchor. It also makes it harder for Red to run out next turn. Note that Red still has TMP and will probably have to break something somewhere next turn.

9. RED: (6 3) 22/16 9/6

WHITE: (4 2) 5/1 4/2

10. RED: (6 3) 22/13


22/16, 6/3 is a very close alternate here, no indirect shots at he expense of losing a valuable builder.

WHITE: (4 2) 6/2 6/4

Not a very good play from Martin, 5/1, 5/3 is clearly better, retaining a four point board. His play also kills his last two fives inboard and will force him off his anchor with a 5-3 next. The match play is a blunder costing about 0.12 ppg.


11. RED: Double

Mochy alertly doubles. Although he trails in the race by 16 pips, White's board has crashed and Red will have powerful attacking chances against the last two checkers. Red wins about 72% here, including 15 match winning gammons so this is actually a pass. The take is a blunder costing about 0.24ppg.


WHITE: Take

12. RED: (6 1) 13/6

Mochy not tempted by thoughts of a trap play like 13/7, 8/7. In general you want your opponent to be completely crashed before trap plays become viable and White may yet manafacture a four or five point board.

WHITE: (3 1) 4/1 2/1

4/1, 4/3 is better. Slotting is the way to build a board. Martin may be thinking, "I don't want a blot inboard if I hit a shot next turn", but for that to hurt he needs to get a shot, hit it with a number that doesn't cover and then be hit back from the bar. That's a pretty long parley, certainly under 10% here, so the rest of the time he will gain or break even from slotting. The match play is a small but clear error.

13. RED: (4 2) 16/14 6/2

WHITE: (1 1) 4/3(3) 2/1

14. RED: (3 2) 14/9

WHITE: (3 2) 5/2 5/3

15. RED: (5 3) 9/1

Good play by Mochy. Clearing the 8pt and creating three spares (8/3, 8/5) looks very flexible but unblocking fours is a big downside. The match play may look less flexible but it still has three checkers aimed at the 4pt if White runs with one. The blot on the ace point isn't a big liability and may even turn into an asset.

WHITE: (5 2) 3/1

16. RED: (3 1) 6/3 2/1

WHITE: (5 2) 3/1

17. RED: (6 3) 8/2 8/5

This play provoked a lot of discussion in the whispering gallery. It is probably correct and 9/3, 9/6 is a very close alternate. The match play creates larger attacking chances at the cost of being harder to clear when the attack doesn't materialise. Toss a coin.

WHITE: (6 5) 21/10

18. RED: (6 5) 9/3 9/4*

WHITE: (4 1) bar/21* 10/9

19. RED: (6 1) bar/19 5/4*

WHITE: (4 3) bar/21* 9/6*

Perhaps the toughest play of the whole match. This play is right for money but wrong at this match score, even though it wins more often and wins more gammons! How can that be? The actual figures look like this. I have averaged Snowie's and Gnu's cubeless rollouts.

After the match play White will win 66.9% including 7.65% gammons. Red will win 33.1% including 3.8% gammons. These are cubeless figures, i.e. they assume no later cube action.

After bar/21*/18, White will win 66.85% including 4.8% gammons and Red will win 33.15% including 3.35% gammons. We can see that everything is pretty even except that the double hit wins nearly 3 more gammons. However the single hit is correct and by a large margin. To understand why, we have to know what White's correct cube strategy is holding the cube at this score. He wants to redouble any reasonable opportunity, to kill the cube, kill Red's gammons and activate his own gammons as match winners. He can redouble anything next turn as long as he isn't on the bar! He still leaves 7 fly shots after the single hit of course, but that is better than 11 after the double hit. Not being hit is the deciding factor here, to maximise his chances of shipping a strong cube next turn. Red needs a little more than 30% to take at this score.

What if Red dances again? With one man on the roof White will always have a cash. With two men on the roof he will be too good by a very small margin, so you can see that he doesn't need the extra risk of being hit.

20. RED: (3 1) Can't move

WHITE: Double

Technically this is just too good to double, but to decide that over the board is almost impossible and a cash now is a good practical play, even though a medium sized error costing 0.067 ppg.

20. RED: Pass

And now runnerup (White) leads 8-7 in this excellent match. The next game is the last of the match and I hope to post that next week. Until then, enjoy the game!

Friday 12 November 2010

A Short One, Mochy v. Birkhahn Game 6

1. RED: (6 4) 24/18 13/9

WHITE: (4 3) 24/21 13/9

2. RED: (5 4) 9/4* 8/4

WHITE: (5 2) bar/20 9/7*

3. RED: (6 5) bar/20 24/18*

WHITE: (6 5) bar/20 13/7*

4. RED: (5 5) bar/20 13/8 6/1*(2)

WHITE: (4 2) bar/23 7/3

5. RED: (5 1) 8/2*

WHITE: (6 1) Can't move

Red has a correct double here and White would have a fairly easy take. These positions, where one side has a 20pt anchor but is on the roof against a three point board occur quite often and are usually doubles. Cover/dance loses the market so Mochy should turn it now, although note that it doesn't lose it by much. I think that he knows this and is prepared to pay that price to get the next point. Strong players are reluctant to double people in too easily at this score, because the recube comes earlier than usual. In the first game of a five point match there is a good reason to double, because you don't yet know how your opponent handles the cube. That doesn't apply here and not doubling is a sound practical play even though an error.

6. RED: (3 3) 13/7(2)

WHITE: (3 3) bar/22 13/10(2) 6/3

Martin makes an excellent play here, strengthening his board and making a good blocking point at the coast of leaving some shots. 13/10(3) is second best and would be a small error. Red should double after either play, with attacking chances, a stronger board and a race lead, although it would still be an easy take. However Mochy again holds on and rolls but he should definitely cube here, because now hit/cover/dance is a huge market loser. A large error.

7. RED: (5 1) 8/3*/2

This is a very small error according to a truncated Snowie rollout. However I can't say why that should be, as the match play leaves fewer shots and doesn't give White the chance to make the 22pt anchor. I like the match play although 13/12*, 7/2 is probably very close.

WHITE: (6 1) Can't move

8. RED: Double

WHITE: Pass

........and Mochy leads again, 7/6. Next game coming up in a day or two, stay tuned!

Wednesday 10 November 2010

Mochy v. Birkhahn, Game Five.

Mochy v. Martin Birkhahn game Five, Mochy (Red) leads 6-2


1. RED: (6 1) 13/7 8/7
WHITE: (6 4) 24/14
2. RED: (6 2) 24/18 13/11*
13/7, 13/11* is probably slightly better, so that White doesn't have good sixes from the bar.
WHITE: (6 3) bar/22 13/7*
3. RED: (4 3) bar/18*
WHITE: (6 1) bar/24 13/7*
4. RED: (5 3) bar/20 11/8


This looks good, picking up the blot from the 11pt. It's more useful on the 8pt and safer. Mochy might also have tried the more aggresive bar/20, 6/3* or the radical bar/20, 24/21, both of which appear to equal the match play.
WHITE: (6 3) 13/7 8/5*
5. RED: (6 2) bar/23 13/7
WHITE: (6 2) 13/5
6. RED: (5 1) 13/12*/7


Another good play, solid and risk free. The more aggressive 13/12*, 8/3* is however equally good. As the match leader Mochy is trying to keep the lid on the volatility, knowing that anything that smells of gammon will get him cubed, but the double hit is strong here too.
WHITE: (5 4) bar/20 24/20
7. RED: (4 1) 23/22 7/3*
Mochy goes for hitting loose behind the anchor. This might look like an unnecessary risk, but it does help him positionally in two ways. It keeps his last outfield checker and unprimes one of his back men, admittedly at the expense of a lot of shots from the bar for White. What Mochy is doing is taking the risk now rather than next turn, because Red's position will be very brittle if he plays 13/8. Actually 13/8 is slightly better according to the rollout, but the match play is only a very small mistake.
WHITE: Double


Well played by White. A minimal double but Martin alertly seizes his chance. Although he trails by a lot in the race he has all the positional advantages, both 5pts and a four-prime. Also he now has the volatility that he has been waiting for, with shots this turn. I wonder if he would have doubled if Red had made the quiet play? It would still have been correct, but we'll never know.
7. RED: Take
WHITE: (6 4) bar/15
9. RED: (5 4) 13/8 7/3
WHITE: (5 3) 8/3* 6/3
10. RED: (6 3) Can't move
WHITE: (4 2) 8/4 6/4
11. RED: (6 5) Can't move
WHITE: (6 5) 7/1* 6/1
12. RED: (6 3) Can't move
WHITE: (6 1) 15/8
13. RED: (3 1) Can't move
WHITE: (3 2) 24/21 8/6
14. RED: (4 2) bar/23
WHITE: (4 1) 21/20 6/2*
15. RED: (6 3) Can't move
WHITE: (6 1) 20/14 7/6
16. RED: (6 1) Can't move
WHITE: (5 4) 20/15 6/2
17. RED: (4 3) Can't move
WHITE: (3 1) 15/12 14/13
18. RED: (2 1) Can't move
WHITE: (5 1) 20/15 12/11
19. RED: (5 4) Can't move
WHITE: (2 1) 15/12
20. RED: (6 5) Can't move
WHITE: (5 3) 12/9 11/6
21. RED: (3 2) Can't move
WHITE: (6 1) 13/7 6/5
22. RED: (3 2) Can't move
WHITE: (3 2) 9/4
23. RED: (6 6) Can't move
WHITE: (6 3) 7/1 5/2
24. RED: (5 1) Can't move
WHITE: (4 3) 6/2 6/3
25. RED: (5 1) Can't move
WHITE: (6 1) 5/off 5/4
26. RED: (6 5) bar/19 bar/20
WHITE: (5 4) 4/off(2)
27. RED: (5 5) 20/10 19/9
WHITE: (5 5) 4/off(2) 3/off(2)
28. RED: (6 4) 10/4 9/5
WHITE: (5 3) 3/off 2/off
29. RED: (4 1) 8/4 7/6
WHITE: (6 2) 2/off(2)
30. RED: (5 1) 8/3 7/6
WHITE: (2 2) 2/off 1/off(3)

..........and White levels the match at 6-6. Nothing Red could do there after the take, while White played faultlessly throughout and timed his cube perfectly.

Sunday 7 November 2010

The Comeback Starts Here


Game Four, Red (Mochy) leads White (Martin Birkhahn) 6-1 to 11.

WHITE: (6 5) 24/13
2. RED: (6 5) 24/13
WHITE: (1 1) 8/7(2) 6/5(2)
Note that 24/22, 6/5(2) is equally good. The 8pt is almost as good as the bar here and moving up at the back makes it more dangerous for Red to bring builders down into his out field.
3. RED: (6 3) 24/15
WHITE: (2 1) 13/10*
4. RED: (6 2) bar/17*
WHITE: (3 1) bar/24 13/10


White could also try bar/21 here. The match play is very static and exerts no pressure on Red to roll well, whereas the contact play aims for a blot hitting contest that caters to White's better board. The two plans are about equal.
5. RED: (4 1) 17/13 6/5
WHITE: (6 4) 24/20* 13/7
6. RED: (5 5) Can't move
WHITE: Double


Pass is correct. Red trails in the race, has no board and can't even anchor unless he gets a second man sent back. White's men are all in good positions to prime, blitz or just race. Nonetheless, this is probably just about a take for money, but a pass at this score, partly because gammons are much more valuable to White than they are to Red and partly because the cube is almost useless to Red.
6. RED: Pass

Tuesday 2 November 2010

You Tell Me!


Some positions defy analysis. When this roll occurred in game Three of Mochy v. Birkhahn, Birkhahn (White) played 13/10, 13/12, much to the surprise of this observer and indeed the rest of the gallery. I can't say that I would even have had this in my list of candidates!


White trails 1-4 to 11.

A major problem for players and bots alike is that there are thousands of ways to play this, so we need to do some pretty severe sorting before we get to a list of viable plays. I think that here we can discount plays that break White's prime, his major asset. I also can't bring myself to include any plays that split the anchor. There are three usual reasons for splitting an anchor: to facilitate escape, to try for a higher anchor and to improve coverage of the outfield. White isn't trying to escape as he trails in the race. He can get a higher anchor with this roll in safety. Red has no checkers in the outfield. Not only is there no reason to split the anchor, but Red will welcome it as a chance to develop his terrible stacks by hitting.
After this, we can divide our candidates into three sections; plays that leave the anchor where it is, plays that move to the 21pt and plays that move to the 20pt. The third section of course contains only one play, 22/20(2), while the first and second include various plays from the midpoint.
Over the board, I would have not seen much further than 22/20(2). It has some things going for it, notably the end of Red's small threat to prime those checkers and the opening up of 5-5 and 4-4 to jump out and get back into the race. The drawback is that it eases Red's problems for the moment, allowing him to dump checkers behind the anchor and wait for a fly shot to run out with a tempo or a 6-6.
Plays that go with 22/21(2) are these: (a)13/11; (b)13/12, 6/5; (c)13/12(2).
I like these plays in that order. (a) offers three rolls to make the six prime next and with some degree of safety. Red won't hit with a 6-1 and will only hit with a 6-3 because he has to blot with that number anyway. (b) appears to be slightly inferior as it only gives two rolls to make the six prime and Red should probably hit with 6-2 as well as 6-3. In addition, having a spare on the 6pt is better than one on the 5pt. The spare on the 5pt can't play fives or ones and if Red does hit in the outfield, then ones will be duplicated as a hitting number. (c) is completely safe, but only leaves one number to make the six prime.
The group where White stays on the 22pt is of course the largest of all. Two of these we can eliminate straight away. 13/11(2) has the same drawbacks as 13/12(2) above and 13/9 leaves no numbers at all to make the six prime. This leaves us with (a) 13/10, 13/12, (b) 13/10, 6/5 and (c) 13/12, 13/11, 6/5. These are very hard to order. (a) has 12 numbers to make the six prime but offers Red the chance to hit his way out with all sixes except 6-4, where he will prefer to make his 2pt. (b) has 14 numbers to make the six prime, with the same drawbacks as (a) and the additional weakening of the spare on the 6pt. I make those two about equal. Play (c) only leaves three numbers to make the six prime and again weakens the spare on the 6pt, but it's pretty safe. Red won't want to hit with 6-1 and might choose not to with 6-2.
I think that leaves us with a list of five candidates. (a) 22/20(2). (b)22/21(2), 13/11. (c)13/10, 13/12. (d) 13/10, 6/5. (e) 13/12, 13/11, 6/5.
Now all that we need to do is feed these into the bot and see what comes out the other end. I have tried truncated rollouts on lower settings on both Gnu and Snowie, with inconclusive results, so I am now waiting for a longer one to finish in Gnu. One thing that I can say is that all these plays are fairly close and that one or two others are probably almost as good! Kudos to Martin though, for finding an imaginative and distinctly more gammonish alternative to the more stolid, 22/20(2). A very long and time-consuming rollout on Gnu 2-ply indicates that all these five plays are within 0.02 of each other, really too close to call. 24/20(2) was best, but not by any convincing margin. Basically, the position is so static that nothing much is going to change in the next roll or two!

Sunday 31 October 2010

Mochy v. Birkhahn, Game Three

Game Three, Red leads 4-1........

WHITE: (4 1) 24/23 13/9
Martin might also have tried 13/9, 6/5, almost as good in theory and more gammonish
2. RED: (5 4) 24/20 6/1*
24/20, 13/8 and 24/15 are more usually tried here, but Mochy has picked this play up from the bots. Its sole purpose is to take away half of White's next roll and it usually leads to a difficult passage of play, ideal for a strong player.
WHITE: (4 2) bar/23 13/9


A tough play straight away for White. The match play looks reasonable; an anchor, an outfield point and no blots, but this is probably third best. Bar/23, 9/5* is better, winning (and losing) more gammons than the other plays, but the best is bar/21, 23/21. Taking a high anchor may appear defensive, but it does allow White to attack with freedom if he gets the chance. Red doesn't gain much by hitting on the 16pt and in fact will sometimes eschew it in favour of anchoring. A very difficult roll to sort out over the board, hard to blame Martin for this medium sized error.
3. RED: (6 1) 13/7 8/7
WHITE: (1 1) 23/22(2) 6/5*(2)
This looks like the best play, but 23/21, 6/5(2) is also strong, taking the opportunity to diversify while Red is in the air and has a blot inboard. 8/7(2), 6/5*(2) is also appealing at first view, but it doesn't play so well and is clear third in the rollouts. It's not that it's a bad plan, just that developing the two men at the back is better. After this great roll White is close to the doubling window next turn, so he doesn't need to make big plays. He can just tiptoe towards an optimal cube, hence his good play here.
4. RED: (4 3) bar/21 24/21
WHITE: (6 1) 13/7 8/7
5. RED: (5 5) 13/8(4)


Mochy made this play fairly quickly, indicating confidence and Gnu 2-ply will play this, but Snowie marks it as a blunder and prefers to bury some checkers behind the anchor. A long rollout doesn't really seperate the best plays convincingly, so note that 13/8, 7/2(2), 6/1 is probably equal to the match play and 13/8(2), 7/2(2) might be slightly inferior. I like the match play for what that's worth.
WHITE: (1 1) 13/12(2) 12/10
This position and this play deserve a post all of their own, which precedes the analysis of this game.
6. RED: (5 1) 8/7 6/1
WHITE: Double


This is technically too early. It isn't very gammonish and the whole position is rather static, so very few ways to lose the market. Even if White makes his prime, he doesn't always lose his market and often has an optimal double. Only a very small mistake though.
6. RED: Take
WHITE: (6 2) 22/16 12/10
8. RED: (5 2) 8/6 7/2
There we saw a sequence where White rolled his best number and Red rolled poorly. If the cube were still centred, this would be a strong double for White and a correct take for Red!
WHITE: (3 2) 22/20 16/13
Probably a small error. Red still leads in the race and White needs to catch up, as well as angling to pick up another checker back if he can, so plays like 16/11 or 16/14, 6/3 make sense. Either of these may generate a shot or force Red to bury more checkers. The risk of being trapped is very small, so well worthwhile.
9. RED: (4 1) 8/7 6/2


Mochy might also have tried 7/3, 7/6 to clear a point.
WHITE: (6 4) 20/14 13/9
Nothing to be gained by staying now and a few bad sequences if he does, so White correctly leaves.
10. RED: (4 1) 7/3 6/5
Mochy slots two points to complete his board as fast as possible.
WHITE: (4 4) 14/2 9/5
11. RED: (4 2) 8/4 7/5
WHITE: (3 1) 6/2
12. RED: (5 1) 8/3 5/4
WHITE: (6 2) 7/1 7/5


This is just wrong. "Break from the back and don't ask questions" is usually right and it's right here. While Red has a good home board, White needs to concentrate on the bear-in. The match play is an error costing about 0.05 of a point.
13. RED: (3 2) 8/5 7/5
WHITE: (6 2) 8/2 8/6
14. RED: (6 1) 5/4
WHITE: (4 1) 5/1 2/1
This is the wrong idea too. Red still has a closed board, so safety remains the priority for White. 10/6, 10/9 is correct and the match play is a small mistake.
15. RED: (5 3) 6/1 6/3
WHITE: (3 3) 10/7(2) 9/6(2)


Now Red's board has cracked and he has to leave next turn with sixes and fives. White no longer has to make safety his main priority and will want to attack any checker that gets left behind, in order to activate a small gammon chance. 9/3(2) is the best play. After that, only 6-6, 4-4 and 3-3 escape without leaving a shot. After 10/7(2), 9/6(2) red can get away with 6-6, 5-5, 4-4, 6-5, 6-4 and 5-4. Moreover White's attack will be less effective with a four point board than a five pointer. The match play is a small error.
16. RED: (3 1) 4/1 3/2
WHITE: (5 3) 6/1 6/3
17. RED: (6 5) 21/15 21/16


Yet another apparently routine but actually difficult play, this time for Mochy. 21/10 is the best play, staying back for shots after 6-6, 6-3 and 4-3, as well as forcing White to waste pips with 5-3. Hard to evaluate over the board but 21/10 is clearly right and the match play is an error costing 0.06.
WHITE: (4 2) 7/3 6/4
18. RED: (3 1) 16/12
WHITE: (2 1) 7/5 1/off
19. RED: (5 1) 12/6
WHITE: (5 3) 5/off 3/off
20. RED: (6 6) 15/3 6/off 5/off
WHITE: (3 3) 6/off(2)
21. RED: (3 3) 5/2 3/off(3)
WHITE: (6 5) 5/off(2)
22. RED: (6 5) 4/off(2)
WHITE: (5 3) 5/off 3/off
23. RED: (6 2) 2/off(2)
WHITE: (3 2) 4/1 2/off
24. RED: Double


Clear double for Red of course and usually a pass, but not here. White can take with 20% at this score and he has that. Martin doesn't give up much by passing though, a medium error costing 0.056.
WHITE: Pass


Wednesday 27 October 2010

Mochy v. Birkhahn, Game Two (Part 2)


So, taking up where we left off, Red has just redoubled to 4 and White took, leaving the position above.


14. RED: (4 2) 23/21 13/9
Note here how Mochy uses this roll to do two good thing, make a good anchor and diversify his spares on the midpoint. The anchor is insurance against a bad sequence and 13/9 provides another builder for the vital 4pt. Continuing the blitz on this roll with 5/1* would be a big mistake. That builder is needed for the 4pt and the match play allows Red to select one of several game plans as the dice decide.
WHITE: (6 2) bar/23 11/5


This is a sizeable error by Martin. 21/15 is better, taking his chance in the outfield rather than being attacked on the 21pt. If Mochy hits in the outfield, he can't also make the 4pt, except of course with 3-3 which is a huge roll anyway. This is not an isolated case. In general you don't want to be on the point that your oponent wants next when he has builders lined up ready to pounce.
15. RED: (6 3) 13/4*
Another strong play from Mochy. The 4pt has MIP (most important point) status for both sides. If Red can make it he will effectively strangle White, if White can make it he will have good chances in a mutual holding game, particularly as he now holds the cube. 13/7, 9/6 is much too timid.
WHITE: (6 4) bar/21* 23/17

Brilliant. How many of us would have found this play instead of the "obvious" bar/21*/15? Why is it best, when it was correct to step out in the previous diagram? There the danger lay in Red hitting on and simultaneously making the 4pt. Here he can't do that, so White can leave it slotted as a point that he very much wants to make. Very easy to see now, but it also requires considerable courage to lay out 4 blots with the cube on 4! Note that fives and ones are duplicated and that the match play exerts a huge threat on Red's outfield blot. Well played.
16. RED: (6 3) Can't move
WHITE: (3 3) 24/21 17/14 13/10(2)
17. RED: (3 3) Can't move
WHITE: (6 2) 23/21 14/8


I don't see the point of this play. White doesn't have a cover number for the 8pt unless he gives up the more useful 10pt, so the blot is just a blot on the landscape. Moreover it creates a large gap between the 21pt and the 10pt. Keeping your checkers connected, i.e. within six pips of each other, was a feature that the old masters stressed constantly. It's less fashionable now in these more dynamic days, but still important here as White seeks to bring his back checkers out and round. 23/21/15 is the best play and the match play is an error.

18. RED: (4 4) bar/21 21/17*(2) 13/9
This is probably best, but bar/21, 21/17*(3) is almost equally good in the rollout. Making the 9pt is less valuable than usual as Red is now the pip leader again and doesn't need a blocking point that he will have to clear later. However it is a useful landing point. bbbbb
WHITE: (5 2) bar/23 7/2
19. RED: (6 3) 21/18*/12
WHITE: (6 1) bar/24 21/15
20. RED: (2 2) 12/10*/8 5/1*


I don't understand this play. If you are going to hit loose on the ace point you may as well make it. 12/10*/8, 3/1*(2) seems clear to me. The second best play in the rollout is 13/11, 12/10*/6 which demonstrates how damaging it is to be hit immediately. 13/11, 12/10*, 3/1*(2) doesn't do as well as any of these, presumably because getting a checker onto the 8pt is very important. Ibbbbbbbt has two functions there, being both a slot for the 8pt and an extra builder for the 2pt as required.
WHITE: (4 2) bar/21 bar/23
21. RED: (6 3) 17/8
WHITE: (3 2) 10/8* 5/2
22. RED: (6 2) Can't move
WHITE: (6 5) 21/15 10/5


When I first looked at this position I liked 21/10. Making the point 6 pips away from the "escape hatch"(here the 21pt) is usually very strong, guaranteeing that the checker on the bar can't enter and escape without leaving a shot. However the match play does best in the rollout, partly because it increases White's chances of picking up a second checker and partly perhaps, because it is slightly better connected. White might well want to make the 15pt for outfield control and as a staging post for the back men when they leave.
23. RED: (5 4) bar/16
Looks like a small error for mochy here. Bar/21, 13/8 leaves fewer shots and gets down to one blot.
WHITE: (2 1) 15/12*
24. RED: (4 2) bar/21 16/14
WHITE: (2 1) 12/11*/9
25. RED: (6 4) bar/15
WHITE: (6 5) 21/15 9/4*


Nobody liked this play at first sight and indeed snowie 3-ply marked it as a blunder. However a rollout shows that it is only a small mistake at worst. Hitting loose leaves 15 shots, whereas 21/10* only leaves 11, but note the better diversification after 21/15, 9/4*. If Red dances, White has sixes to escape, fives to hit a second checker, fours and ones to make a five point board and twos to get to the edge of Red's prime. After 21/10*, White has duplicated his own sixes and will often have to hit loose next turn anyway. So, interesting play, even if probably a small mistake.
Facile to point out how much White regrets not having played 23/21 with his two last turn.

26. RED: (5 2) Can't move
WHITE: (3 3) 15/6 4/1
White rolls a lemon; only 5-5 is worse. His play is good, probably equal to 15/6, 8/5 which concentrates on making the 4pt at the expense of duplicating his own twos

27. RED: (3 2) Can't move
WHITE: (6 2) 23/15
28. RED: (1 1) bar/24* 15/14 5/4*(2)


It's a great roll but how to play it? It's obvious that Red is going to put two men on the roof, but which two? Mochy though it right to play 5/4*(2) but giving up his 5pt is very damaging. A good sequence for White with the 20pt open might be a winner and it is pretty clear that Red needs to keep his five prime. Gnu 2-ply will play the same move as Mochy, but rollouts on Snowie and Gnu agree that this is a blunder. Bar/24*, 3/2*/1, 3/2 tops the rollout, with bar/24*, 15/14, 3/2*/1 a close second. Bar/24*, 15/14, 3/2*(2) is third and is a small error. This must be that if it comes to a blitz, as it often does, the 2pt or the 3pt are easier to cover than the 1pt. Note that plays including 15/14 expose Red to the superjoker 4-4 from the bar.
WHITE: (2 1) bar/23 bar/24*
29. RED: (5 1) bar/24 14/9
WHITE: (2 1) 6/4 5/4
30. RED: (6 4) 24/14
WHITE: (5 3) 23/15
31. RED: (6 5) 24/18 14/9
WHITE: (3 3) 23/20 15/12(2) 8/5
32. RED: (6 5) 18/7
WHITE: (3 1) 24/20
33. RED: (3 1) 9/6 9/8
WHITE: (2 2) 12/8 5/1
I can't see the point of slotting the ace point; 12/6, 12/10 looks better, but it doesn't matter much.
34. RED: (4 3) 8/1
WHITE: (6 3) 12/3
35. RED: (5 2) 7/2 3/1
WHITE: (2 1) 8/7 3/1
36. RED: (4 2) 8/4 8/6
WHITE: (5 2) 20/13


Martin correctly runs while Red has two blots inboard. He still trails by 7 after the roll, but he isn't going to get a shot next turn so trashing the board and hoping to win after a shot in two or three turns time isn't realistic. Staying back also wastes pips in a close race. Good play.
37. RED: (5 4) 7/2 7/3
WHITE: (3 3) 20/11 13/10
38. RED: (6 6) 9/3(2) 6/off(2)
WHITE: (2 2) 11/9 10/6 7/5
39. RED: (2 1) 2/off 1/off
WHITE: (4 2) 9/5 2/off
40. RED: (6 4) 6/off 4/off
WHITE: (6 1) 6/off 1/off
41. RED: (6 5) 6/off 4/off
WHITE: (3 1) 3/off 1/off
42. RED: (3 2) 3/off 2/off
WHITE: (6 3) 6/off 3/off
43. RED: (6 1) 4/off 1/off
WHITE: (5 3) 6/3 5/off
44. RED: (3 2) 3/off 3/1
WHITE: (3 2) 3/off 2/off
45. RED: (4 1) 3/off 1/off

And Mochy wins 4 points to lead 4-1 going into the third game. We'll add that one next week.
Looking at some of these positions and waiting for rollouts can be time consuming so be patient. I do hope that you are enjoying it and learning from it. You'll get the most benefit if you play the rolls out on a board, rather than just looking at the diagrams. Until next week, enjoy the game!

Tuesday 26 October 2010

Mochy v. Birkhahn, Game Two (Part 1)


So, Martin Birkhahn (White) leads 1-0, let's take a look at the first part of game two, a thriller full of tough plays, big swings and cube action.

WHITE: (6 1) 13/7 8/7

2. RED: (1 1) 8/7(2) 6/5(2)

WHITE: (2 1) 13/11 6/5

Martin makes a big blunder with this roll. He is already in some danger of being primed on the other side of the board, so he makes a play that aims to diversify and build a prime of his own. Actually if he wants to do this, 7/5, 6/5 is better. Owning the 5pt with the bar slotted has to be better than owning the bar with the 5pt slotted. However, the whole plan has a basic flaw, which is that even if he isn't hit, he will always be playing catch up. Red either hits or brings down builders for his own prime without much danger. What White needs to do here is to take advantage of Red's temporary shortage of builders and split at the back. 24/21 or 24/23, 13/11 are both much better than the match play but best of all is 24/22, 24/23. This puts the most pressure on Red's slot and has the best coverage of the outfield. This is similar to a position that I posted on Sep. 15th, take a look back.

3. RED: (6 3) 24/15

This is a reasonable play from Mochy. The bots have trained us to run out in this sort of situation and take our chances there, rather than be attacked inboard, but 24/21, 13/7 may be better. The 21pt blot isn't in much danger and 13/7 adds a very useful checker to the attack zone. Snowie plays that and the rollout suggests that it is marginally better.

WHITE: (4 2) 11/5

4. RED: (6 4) 15/9 13/9

WHITE: (6 1) 24/17*

5. RED: (4 2) bar/21 24/22

WHITE: (5 3) 8/3* 6/3

6. RED: (5 3) Can't move

WHITE: Double


White on roll, Red on the bar, race lead, threats and a better position, so a mandatory double and another tough cube decision for Mochy. However, although he is on the bar, he has a few things going for him here that he didn't have in the first game. He has a broken 4 -prime of his own, he only has two blots and very importantly, White hasn't made his 4pt yet. Owning 6-5-4pts is much stronger than 6-5-3 and I think this may have been the key factor that got Mochy to take. Snowie makes this a close pass, so not a very bad decision, particularly as it is a high skill position with a long way to go. A technical error, but in match play a marginal take/pass.

6. RED: Take

WHITE: (5 4) 13/4*

8. RED: (5 4) bar/21*

WHITE: (6 3) bar/22 17/11

9. RED: (2 1) bar/23 6/5

I like Mochy's play here, but bar/24, 13/11 is probably equally good. It diversifies nicely in Red's outfield and the extra blot doesn't make the position much more gammonish according to a rollout.

WHITE: (6 2) 8/2* 6/4*


Excellent play. Most players are reluctant to leave 2 blots inboard, but Martin is an expert and makes the play most likely to win and the most likely to win a gammon. It leaves 21 shots from the bar but 11/5, 6-4* leaves 20 and only puts one man up, no contest.

10. RED: (6 4) bar/21*

WHITE: (5 5) Can't move

11. RED: (6 1) bar/24, 9/3*

WHITE: (6 2) bar/23


Red has a very strong double here, in fact he may well have been in the window on his previous roll! Mochy certainly thought about it. With 4 blots on the board and a fifth on the bar, this position is about as volatile as is possible. Moreover every single Red roll plays well. The worst is probably 5-3 and even that makes a third point inboard and puts a second man on the bar! I mark this as a marginal take/pass for White, but over the board I would have happily scooped. Food for thought for all of us and a very instructive position to practise with. Red rolled...

12. RED: (6 1) 24/23* 9/3

WHITE: (4 3) bar/21

13. RED: Double

WHITE: Take

Clearly Red has improved a lot and doubles. As White had a marginal take last time he should pass this, but Mochy's "wait and see" tactic pays off big time and he gets a take! Large blunder from Martin. Five blots including the man on the roof makes this far too gammonish for a take.

So, what happened next? Join us later in the week for the rest of this great game.


Monday 25 October 2010

Mochy v Birkhahn


Last Saturday we were treated to an exhibition match on Fibs. Runnerup (Martin Birkhahn) was the Fibsleague Master's Champion for 2009 and Franck del Rio, the Director of Fibsleague arranged for him to play an exhibition against Masayuki Mochizuki from Japan. The current world champion Mochy, as he is known for obvious reasons, is a great ambassador for the game, travelling the world to play backgammon and impressing everywhere with his skill.
The 11 point match was watched by an enthusiastic crowd of 30 -40 fibsters and over the next few days I want to take a look at some of the more interesting plays.
Set up a board and follow the play.
Mochy is playing the Red checkers and Martin the White. Here's how game 1 went.

1. RED: (6 3) 24/18 13/10

WHITE: (3 3) 13/7*(2)

This is the best play, hitting, making a good point and moving two more checkers into the attack zone all in complete safety. You often see 13/7*, 8/5(2) 0r 13/7*, 6/3(2), but they make more sense when trailing in the match and you need to go after a gammon from the word go.

2. RED: (4 2) bar/21 10/8

Mochy commented, "Already I don't know what to do". It's the third move of the game and a master is puzzled, which shows you how hard backgammon can be. He opted for the simple play, no doubt feeling that four blots was a bit much even for the opening. It's a close call. Bar/21, 13/11 is probably equally good, with lot's of potential for development if he isn't on the bar next turn.

WHITE: (6 4) 13/7 8/4*

White has the checkers for a blitz and opts for the natural-looking 13/7, 8/4*, but this looks like a small error. He leads by 14 pips after the roll, so he doesn't need to try for the blitz and leave 20 return shots. The computer play is 24/20, 13/7. I can't say that I would have found this over the board, but Snowie likes it best.

3. RED: (6 6) Can't move

Whoops, 6-6 from the bar. With his lead and his attacking possibilities White is already in the doubling window and could ship one in here. No chance of a bad pass I think, so you can't blame him for waiting, with the match only just under way and a large audience.

WHITE: (4 2) 24/20 6/4

4. RED: (5 3) bar/20 8/5*

Mochy enters with a lemon and does the best he can, slotting both 5pts and putting White on the bar. This is actually a defensive play, taking away half of White's next roll and and giving him a few bad numbers. It leaves this position.....................

..........and it's clear that Martin should double from the bar. Race lead, much better position, substantial threats, it cries out for a cube. Only Martin can tell us why he didn't turn it and we can bet that Mochy was pleased not to be doubled.

WHITE: (6 4) bar/15

White throws one of his bad sixes, so feels pleased that he didn't turn it.

5. RED: (1 1) 8/7(2) 6/5(2)

I'm not sure that Mochy makes the best play here. The blot is useful but subject to 6 hitting numbers, all of which don't play well on the other side of the board. Snowie plays 8/7(3), 6/5, hard to find, but with White about to attack on the other side a bit of solidity can't hurt.

WHITE: (3 2) 8/5* 7/5

6. RED: (4 3) bar/22 5/1*

Again Red makes a defensive hit, hoping to keep White off balance for a roll.

WHITE: Double

Now White doubles from the bar. Mochy thought about taking this one and at the time I thought that it might be a close take, but he summed it up perfectly. "4 blots, outboarded, no anchor, behind in the race, I pass".

6. RED: Pass

So, a short but instructive game. Mochy ends it with a pro pass, but Martin missed two chance to double him in, one slim, one fat. He is usually a pretty aggressive cube handler, so perhaps he is just slow out of the blocks. The lesson to be learned here is that you have to be alert and ready to use that cube, right from the word go. Doubling opportunities can occur from your second roll of the game and you mustn't let them go by.

We'll take a look at the second game in the next post. It was long and complex, so be patient. It might take a day or three to do. Until then, enjoy the game!