the dorbel daily

Sunday 26 June 2011

Strange Worlds.


I agree that making the Golden Anchor is usually right, which is what makes this such a tough play. I have a feeling that over the board I would have done that too, but it's a huge blunder!
Bar/20, 24/22 is best by far. This duplicates sixes to hit, whereas bar/20, 23/20 allows White to attack with ones, threes and sixes. The key feature of this position is White's mini stack on the 4pt. If Blue anchors on the 22pt, these checkers are pretty useless, almost dead for the moment. When Blue anchors on the 20pt, suddenly those checkers come back to life with a useful function, attacking the blots on the 3 and 1pts! Well done Steve for getting this one right.
Use this unusual position as an example of how to think about backgammon. It doesn't mean that grabbing the Golden Anchor is suddenly a bad plan, just not here. Why don't we see this more often? It's a novice match and some odd plays by both sides have taken us into a strange place where an ability to think on your feet is more important than playing by rules that are usually helpful.

Prime v. prime. Hard plays, tough cube action and a favourite playground of the best players, where they hope to make their skill count in positions where big equity swings are possible.
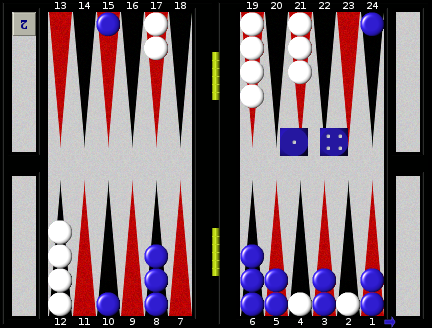
I faced three cube action problems on successive plays in the first game of a five point match on fibs. Here's the first. What is the correct cube action for both sides here? Oh yes, hope you like the new board! Black is on roll.


Position ID: ttsDADDYdksAMA
Match ID: cAmgAAAAAAAA
Even though I have a six prime, I just hate to give away the cube while I still have two checkers behind a five prime. Note that White doesn't have to play sixes or fives at the moment which will slow her down considerably, while her two spare fours will keep her board for a couple of turns with luck. Also she has some room to manouevre in my board, as my prime only extends as far as the 4pt right now. Cube ownership is so powerful in prime/prime games, where one crashing sequence can turn the whole game around in a flash, so I decided to wait a turn. Generally I prefer to double people out rather than in when it's a priming battle, but this is however a close pass already and not doubling is a blunder!
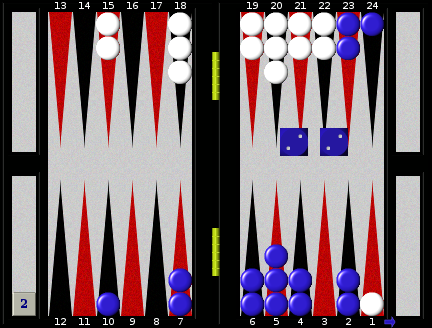
Well I rolled 4-1, played 11/6 and White rolled an excellent 6-5 and didn't have to move at all.


Position ID: ttsDADDY7hYAMA
Match ID: cAmgAAAAAAAA

If I didn't think I was good enough to double next turn, logically I can't here either as I've just got worse. I've burned five pips of timing and White has held her position nicely. It's no longer a cash, but Black should double and White has an unpleasant take.
I rolled 9/3, 6/3 and White's 3-1 was played 24/23, 6/3 (brilliantly I thought) to leave us here.


Position ID: drcDAChs2w0AMA
Match ID: cAmgAAAAAAAA

You'll be getting the hang of this now. It's clearly right for me to double, a big blunder not to do so and White has a thin take, pretty much based on cube ownership. These takes by the way would be passes at many other scores, but owning the cube in the first game of a five pointer is worth a lot more than usual, as your redouble gets you to Crawford, so you can get a pass witha 4 cube much earlier than usual.
Allocate yourself a lot more time in prime/prime battles and look carefully at all the checkers. Even one pip somewhere can make all the diference.
I'll try and find you something else interesting for tomorrow. It shouldn't be too hard in this most fascinating of board games. Until then, enjoy the game!


Friday 24 June 2011

A Tough Call For Ducks.


This is where we left it in the last post. Blue leads 1-0 to 5.
I tried 10/4, 5/3, which clem also suggested in his comment. It's a blunder. Like him I thought that I would try to hold onto my bar pt as long as possible, but in practice this just isnt realistic. Its worthless when White hits and when she doesn't, White will find a play on the other side of the board and I will then have to break the bar anyway. Best to do it now and make the 3pt, 7/3(2). Usually better to make a point than slot it and a five prime is not to be sneezed at. I even get some safe sixes to play next turn! The score is the key here. The most important feature is that Blue can't risk having a fourth man sent back. He may be hit this turn and after the match play he is more likely to be hit later too! The match play is probably correct at dmp but loses many more deadly gammons here. As it happens, White rolled 6-6 next, crashed and my blunder worked brilliantly! That's bg.


I think most of us play with ideas in our heads that are a shortcut for thinking. Here's a fascinating position from a match I watched on gridgammon.


It's 0-0 to 5. Blue is a beginner and she got it very wrong. See if you can do better and tell me the answer. I'll let you know what she tried and what she should have done tomorrow and I do mean tomorrow. I know that sometimes days go past in between posts. Be patient please, life sometimes interferes with backgammon.
Until tomorrow, enjoy the game!

Wednesday 22 June 2011

Slot Or Not


Position ID: OM/gARIzOycIIA
Match ID: QYnwAEAAAAAA

I will go on with the last position from the previous blog in a minute, but first I want to show you the preceding roll, as they make a very interesting pair. I got both of these wrong.
In the above position, Blue trail 7-away, 3-away and White owns the cube. I played 8/4*, 15/14 (to duplicate twos and give me 5-5 as a cover number). This is wrong. If White hits back from the bar, my blitz stalls. If she doesnt, I can carry on blasting away. Either play of course leaves the same chance of anchoring on the 4 or 2pts. It would be nice to have the 4pt slotted, but with four blots around the board, this is too much risk to carry. 8/4*/3 is the best play. The 4pt is not yet so important that I need to take a big chance to get it.


Then we came down to the next roll. White has anchored, so should I leave the 4pt slotted? Now the answer is yes! White is going to sit on her anchor until the end unless she gets a shot. Now Blue needs the 4pt a lot, as an essential part of the prime that he needs to build. 14/10 is the play, cutting the blots down to 2 and putting a lot of pressure on White if she breaks her anchor to hit. We could of course cover the 4pt from the 8pt, but giving up the point that blocks White's sixes is a high price to pay and gets us back to 4 blots, which as I never tire of pointing out is more than most positions can cope with.
What we have seen here is two different game plans. In the first position Blue is blitzing and doesn't need the extra risk of the slot which may stop his blitz dead, particularly if White can hit twice. In the second position White has anchored, so Blue must switch to priming and the 4pt is vitaly important to that prime. Leave it slotted.
Clearly I haven't had these principles organised in my mind, but they do come up a lot, so I'll be on the look out for the same thing again. Let's hope I get it right next time!

Now here's one from another match.


Position ID: bLdjACBmtxEALA
Match ID: UQmpAAAACAAA

Blue leads 1-0 to 5, owns the cube and is in a lot of trouble. If you can get this one right for the right reasons I will be very impressed!

Give me some thoughts, don't be shy, you may have thought of something I have missed and then we'll all earn something new. I'll try and post this tomorrow. Until then, enjoy the game!

Saturday 18 June 2011

Escape or More Attack?


Here's where we left it, Blue (me) is trailing 7-away, 5-away but as you can see is sitting pretty here. Blue has two conflicting tasks, to continue his escape from behind White's little block and also to maximise his chances of closing his 3 and 2pts. Playing 11/4, which I did, dramatically increases the numbers that Blue has to close another point next turn, a whopping 25 numbers in all. However the Gnu rollout (2-ply, 1296 games) indicates that by a small margin, 21/14 is the best play and even 21/15, 11/10 is better than the extra builder. After 21/14, Blue only has 13 numbers to close another point, but of course his escape has got considerably easier. When I first looked at this position (and even now), making the points looks like the priority for me as the escape appears so easy later, so why is the semi-escape correct? There are several factors at work. The first is that escaping the back men is essential. You can't win the game until you have brought them around and home and off, whereas you can in theory win the game without ever making another point! In practice, you almost always will make them however, because the number of checkers available to do so will increase naturally. The number of escaping numbers will, on the other hand, remain the same. The other feature is joker control. If White quickly throws a small double and enters both checkers, it's better that she can't enter and attack Blue's rear checkers simultaneously. The two plays (11/4 and 21/14) are very close here, so you can see that if Blue's escape was any harder it would become proportionately more important to get the back men moving in relative safety while White is dancing. As a general rule, use the window of opportunity provided by White being on the bar to bring the back men round and worry about closing points later!
I promised you an easy counting tip for the numbers required to close a point next turn. Here it is. Looking at the diagram above, we can see that Blue has three points that he can use to make the 3pt. The number of point making numbers is always the square of the points that you can use, here 3 squared is 9, all combinations of fives, fours and threes. If we play 11/4, that number jumps to 4 squared, 16, or all combinations of five, four, three and one. You do have to check that all the doubles work (3-3 doesn't here) and sometimes there is an extra hidden double that you can add, 2-2 here, but at least this simple formula gives you a basic number to start from. Note in the example above, you do get 5-5, even though the 8pt only has one checker. Note too that the running play, 11/4, adds 6-6 to make the 2pt which is nice!
Much later on, after bearing off 8 men, White primed one man and put a second checker on the bar and cashed. So, into game three trailing 0-4 to 7.


Position ID: OK/BARizdiYEIA
Match ID: QYnsAEAAAAAA


I've cubed early, trapped White on the deuce point and have a 3-1 to play. Not easy or obvious, what's your call? We'll take a closer look at this one tomorrow, until then, enjoy the game!

Thursday 16 June 2011

Double or Too Good?


Here's where we left it, Blue on roll trailing 5-away, 7-away and White on the bar. This is a very strong double and a clear pass. In round numbers, Blue can expect 71% wins from here, including 29 gammons. Blue has a lot going for him, viz. one white checker on the bar, shooting at a second blot, a better anchor and 9 checkers lined up to make the vital 5pt. Should Blue indeed play on for the gammon? It's possible, it's a very close decision, with Blue gaining minutely in theory if he plays on. In practice though, he will have to play very well to achieve the theoretical equity and he will also have to recognise the exact point when he is no longer too good and double if his game deteriorates a bit. This is asking a lot and I always double if I think it is close. Why? If you are wrong and they pass, at least it scores a point without having to play for it. This has to be worth a small piece of theoretical equity. Furthermore, sometimes they take and then you are in clover. White, a 1900+ player on fibs took this.

Then I rolled 3-2.


I chose making the 5pt, but that is a small error. I need to play 21/18*/16. A roll of 6-3, yes, make the 5pt and hope to pick up the blot next time, but giving up the bar to make the 5pt here is just too loose. The bar is still very important and I have three active builders to hit loose on the 5pt next turn if needed, or of course make it. I find that I often make mistakes, sometimes big ones after a double and take. Perhaps when my cube is picked up I just need to take stock a bit.

Then we got to this position.


This one comes up a lot in various guises. Do I carry on with the great escape from the back? Do I wheel anothe builder up to bear on the 3 and 2pts? It's a balancing act, comparing how easy is it to escape with how much another builder really gains. Have a think about it and we'll have another look tomorrow, when I'll show you a cute shorthand trick for counting the number of rolls that make the next point.
Until then, enjoy the game!

Wednesday 15 June 2011

Blundering On.


Here's where we left off. The first thing to do with all of these positions is to count the rolls next turn that force you to blot after each of the candidate plays. (a) 7/2 has three numbers that blot, 6-4 and 4-4. (b) 7/3, 6/5 has four, 6-5 and 5-4. (c) 7/3, 5/4 has five, 6-6, 6-5 and 5-4. One would think that this makes (a) the favourite and in fact that is what I played, but things are not always so simple in our beautiful game. All the checkers on the board are important, not just the area of conflict where we are focussed. White has kept her timing and will normally be able to maintain her powerful prime for two or three more turns. Even when it starts to collapse it should fold down into a dangerous five point board, so we must consider safety on our next few turns as well, not just this one. If White already had all her checkers home, say if you move those three spares to the 4, 3 and 2pts, then playing 7/2 is probably best because later danger, extended jeopardy as it is known in the literature, is much less important. (a) is the third best play here and (b), 7/3, 6/5 is best. It prepares to clear the 6pt next turn, after which life should get a bit easier for Blue. Hard to find? I think so. You give one extra bad roll in return for a position which will play a bit better later. The key is the stripping of the 6pt, so that you clear it next turn with all sixes and most combinations of smaller numbers too.

Next turn, the dice gods gazed at my error and awarded me a 4-4.


Position ID: ttsKADDe7Q4AAA
Match ID: QQnyAAAAAAAA

Here's a useful tip for sorting these out. You only have five legal fours anyway, so take off three of them, in this case two from the 6pt and one from the 4pt and all you have left to do is decide where to leave the blot. Again we have to balance safety now against safety later. Blotting on the 6pt leaves 13 shots and bears off two checkers but is a bit easier to clear up later. Blotting on the 4pt leaves 11 shots and only takes off one checker, but has a worse clear up rate, notably leaving the double shot after 6-5. Actually it doesn't matter here as after the rollout, both plays seem to be about equal! I chose the immediate safety, got hit and lost.
You may well be thinking, "He didn't really tell us how to balance all the different factors there to come up with the answer". That's fair, but so often, there is no way to be sure. What you must do is assemble all the information and have it clear in your mind. Then, make your best guess and sometimes it is only a guess, but it will be better than just wildly picking a play with a pin. That's BG. When you analyse your matches with Gnu, or BgBlitz or XG or whatever, pay attention to these areas. Do what I have done and roll these out or play them a bit. The errors tend to be small, but because they occur in so many games and the possibility of a big swing is so great, it's an area where study will pay off, not least in confidence.

Now on to game two, with Blue trailing 0-2 to 7. Of course I am looking for a cube opportunity with a sniff of gammon about it and here it is.


Position ID: cNfgAFiY25EBBg
Match ID: cAngACAAAAAA

White is on the bar and Blue is shooting at a second blot. White is anchored of course and has made her 5pt. Is Blue good enough to double? If he is, should he be playing on for a gammon? Does White have a take?
All will be revealed in the next post. Until then, enjoy the game!