Usually in this blog I try to focus on my own mistakes. It's good for my own learning process and avoids exposing people to unwanted criticism. Occasionally though, I get permission to feature somebody else's errors and here are some from a regular opponent on Fibs. He's ranked at 1755 which will give you some idea of where he stands in the hierarchy.
His problems, like those of so many, revolve around cube use. His checker play is quite good, but he has the worst possible combination of cube errors. He doesn't double early enough, he cashes games that are too good to double and tragically, takes some passes. Our latest match lasted for 13 games, of which he won 7 but lost the match 9-7.
Here's where the points went missing.

Red is on roll, he trails 0-2 to 9 and he leads 108-118 in the race. Should he double? Unquestionably yes. There are two ways of arriving at this. The first will stand repeating yet again, it is Woolsey's Rule. It goes, "Look at the position from your opponent's point of view. if there is any doubt about the take, it must be a double". "Any doubt" is the key phrase here, it means that if you are not 100% certain that it is a take, it must be a double. Actually it is a take, but certainly if doubled here I wouldn't be 100% certain and I certainly didn't want to be cubed.
The second way to look at it is this, an acronym called PRAT. This stands for Position, Race and Threats. Traditionally an advantage in two of these areas is thought to be enough for double and take and an advantage in all three is double and pass. Actually this is a bit too crude and you need to refine this a little and ask yourself how big these advantages really are, but it will do for this position. Red's Position is a bit better as White still has a man behind a four prime, but this is mostly counter-balanced by the fact that White is at least at the edge of the prime and his own strong board will make hitting loose by Red a risky option. The Race favours Red but it isn't overwhelming; a ten pip lead in a 108 pip pure race would be a take. The Threats favour Red, threats being sequences that lose the market, e.g if Red hits and White dances, then White will no longer have a take. We can see here that all the doublets are excellent, as well as 4-3, 4-2 and 3-2, that's 12 numbers straight off. In addition all the above average rolls play safely and there are only a couple of lemons, 2-1 and 3-1. So all in all, strong double for Red, uncomfortable take for White.
This next one isn't quite so obvious, what's the correct cube action here?
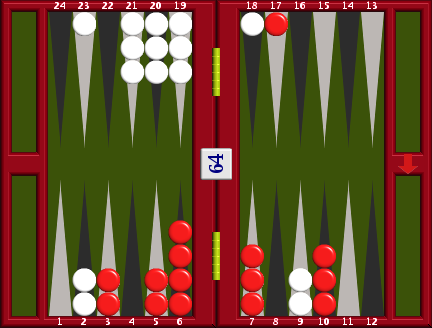
Red trails 1-2 to 9, but leads in the race 108 to 132. Woolsey's Rule, are you sure that this is a take for White? If you said, "Yes I'm sure", then you are a bit wide of the mark as this is actually a pass! Positions where you are anchored on the 24 or 23pt and your opponent has escaped all his men and leads in the race are usually passes. Don't be misled by the fact that White holds the 16pt as well. It isn't going to bother Red much on the way home and those checkers aren't much use to White until they move round to complete his board. If you are doubtful about doubling this as Red (or passing as White), set up the position and play it out 50 times. You should find that White will win 23-24% of these, but 11-12 of his losses will be gammons and that's enough to make it a close pass.
Another way of looking at doubling decisions is to adopt the advice contained in Clausewitz's Rules of War; "Always do what your enemy least wants". As Red the last thing that he wants is to be doubled here isn't it? If you evaluate this rather conservatively and think that this might be a double and might not, then Clausewitz has advice for that too. "Faced with two courses of action that are approximately equal in strength, choose that which allows your enemy the opportunity to make a mistake". If you leave the cube in the middle, no chance of a mistake. If you double on the other hand, he may take when he should pass (as here) or pass when he should take. I might well have taken this.
Moreover, once you have doubled you can't then make another doubling error, whereas the enemy may make several. There are many players who hate to double you in with a 4 cube, actually the player playing Red here is one of them. You can double these players in very early indeed, because they don't get the vig associated with owning the cube! All of these guidelines point to being aggressive with the cube.
In my next post we'll look at some more positions from this highly instructive match and discuss the important concept of volatility, but in the meantime, enjoy the game!
11 comments:
Dorbel,
thank you for taking the time to do the analysis. it is well known that the cube is my biggest weakness, i'm still baffled by Woolsley's law - this is the way i saw it, still do kinda
Position 1 - as red, it looks like a double/obvious take, therfore red should not double.
as white, I would love for red to double against me here, the likely hood of red jamming his men up and then me trapping one or two men is way too tempting. going down 2-2 is well worth the risk
woosley's law position 2
as red, i know i'm ahead and threatening backgammon, so at 1-2 i see this as an obvious pass for white
as white, i think i would love for red to double, gets me out of a very risky position, i don't see this as anyway tempting enough for the risk
I like your PRAT acronym, and i should/will work on this, unfortunatly, for me to acruately asses threat for everymove would make me move slower than blotalot when he was young ;) - so - taking the time on these two positions, let me know how i do
position 1
i see red position as very slightly ahead - although red has a chance of a gammon, white also has possiblity of coming back with a gammon
race - slightly ahead in number, but chance of checkers getting hit here, so it doesn't mean much - chance for me to get further ahead are good, chances for white are fair
threat - here's where i fall apart, counting is impossibe for me to go thru all possibilities without spending hours pre move, but i don't really see any threats on either side here that do not come without of a chance for the other to have a backgame - i guess 2 2 is my best roll, but even that i have to jump over your 5 prime, with all my other men in or close to my home, so i don't see any clear threats
i'll spend more time position 2 and your next blog soon - work interferes with life, thx again
You can be certain that it is a take and it can still be a double.
ok, so am i getting woolsley's law wrong, or am i getting the position wrong? (i still see this as basically even with big chances of gammon on both sides)
also, if i saw this position (#1) as
position - slightly mine
race - slightly mine
threats - equal
would i double?
Woolsey's Rule; "If you are not certain it's a take, it must be a double." The reverse isn't true.
Why would you see Position 1 as having equal threats? Red has threats to point on White and to continue to do that until he has a prime or closes White out. When he can't do that he races. Because he leads and has White behind a four prime, he doesn't need to hit loose. White has almost no threats at all. White gets a direct shot after 3-1 and an indirect afte 2-1, which is not of the same order of magnitude. Still doubtful? Set up the position as it is with White owning the cube, play it 100 times and keep score.
..........and a direct shot after 1-1.
ok... i did not read your explination of what a threat is good enough, the problem i have with assessing threats in this position is any roll, even a 6 4, gives you a chance to trap me back, or get a good back game
6-4 for Red is fine, you just play 13-3. After that White is on roll trailing by 20 pips with no anchor and still behind a four prime. Not much chance of White trapping anything from there is there?
Are you by any chance looking at the board the wrong way round? The home boards are on the left.
wow, that changes things a lot! and i totally see ur point now ;), also, i have been trying to use PRAT in live bg matches, and it so far has worked very well (much better than woolsley's law for me) thank you.
as for position 1, i think i saw as one that is much stronger than it actually is, one that has gammon possibilities and one more roll should determine how good it really is, and if it gets worse, one that i could still double.
pos 2 is similar, gammon posibilities, but waiting to make sure things didn't turn around, not really worried that i would loose my ability to double soon. again i thought my position was much stronger than it actually is.
Post a Comment